
Home Course Building
07 Nov 2008
I’ve been setting up more courses at home and I thought I’d share some steps I took to make that easier. I help build courses at every trial I attend; it keeps me from sitting around and snacking so much. Typically when you set up a course at a trial you unroll a long tape measure down the center of the course and then use a rolling measuring wheel to place the obstacles perpendicular to the tape measure (if the tape measure is the “x axis” you roll out perpendicular to the tape to the set the “y axis” location). Frankly I’m too lazy to do that at home and a good rolling tape measure is expensive.
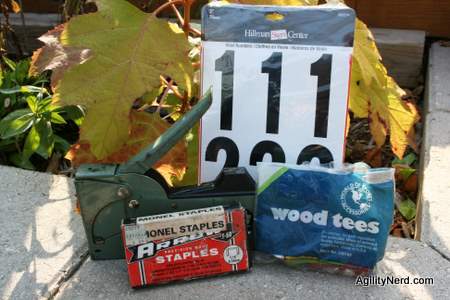
Here are the tools and supplies I used:
Long Tape Measure

Exterior Numbers, Staple Gun, Staples and Golf Tees
Before I get into the details, a minor rant about course builders who endlessly tweak courses before turning them over to the judge. I’ve rarely seen a judge who didn’t move obstacles anywhere from 6 inches to several feet and rotate them when they did their walk through. Unless you are building two parallel courses, like they do at some of the national trials, a course builder need only place obstacles at their specified location. I then walk with the judge during their inspection and immediately tweak the obstacles to meet their needs. I’ve seen course builders add tens of minutes to each course change by adjusting angles and shuffling obstacles around before telling the judge the course is ready. All that tweaking is pointless, the judge will move the obstacles as they see fit. It’s the safety of the course that’s paramount not slavishly laying out the obstacles to the course map.
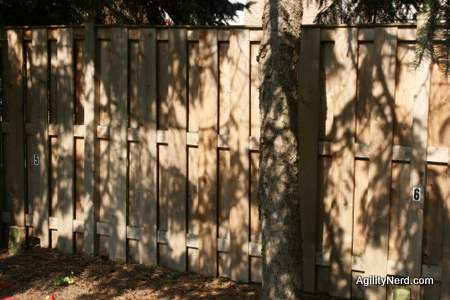
So anyway… This past weekend I went to the hardware store and got some vinyl two inch high numbers and decided to staple them every ten feet on the fence surrounding my backyard. I have a 100 foot tape measure which I attached to my fence and extended the width of my yard. Then starting at the edge of the tree line, I used exterior Monel staples to tack the numbers to my fence. I put them up high enough so equipment wouldn’t hide them but low enough so the tree branches wouldn’t hide them. I repeated the same process along the side fences. For the “front” edge of my yard, next to the patio where there is no fence, I stretched the tape and pushed golf tees almost all the way into the turf every ten feet. I did the same thing in front of each shed in my yard since they are in the way of where the 10 and 90 foot markers would be (and I couldn’t attach the numbers to the sheds in a good way). I was thinking I could push golf tees in at the intersection of every 10 foot line but I ran out of tees and the sight lines are such that I can get a good layout of any course.
The whole project took under a couple hours of messing around, cost under ten dollars and I only put two numbers up incorrectly at first :^)
Numbers Installed
So I went out and setup the USDAA 2008 Steeplechase Finals course and it was a much faster and a more accurate course setup than I would have done by measuring using just my stride length. I could stand in the yard and look to the fences for the X and Y numbers and just drop the obstacles. By having numbers on the two side fences I could also keep the course aligned on that axis.
If you don’t have conveniently located fences you could use any kind of marker that you can place around the outside of the ring (as long as they are out of your dog’s way). I started to use plant stakes, but realized I needed numbers to keep from having to count which was which (is that stake at 50 feet or 60 feet?) You could use different color stakes or plant identification markers onto which you could write or adhere numbers.
Lastly, I had an idea based on some boat navigation classes I took ages ago. If you have some extra room around the outside of your ring you could place two markers at each end of the field and separate them by a few feet (i.e., put them both at 10 feet in the X axis separated by 3-4 feet in the Y axis). Then you could use the parallax effect to verify that you are directly on the line with the marker. To continue my example, if you are standing at 12 feet in the X axis and look toward the two markers at 10 feet you’ll see the nearest marker is shifted to the left of the further marker. As you walk back toward the 10 foot distance you’ll see the two markers come together and be directly in line with one another when you are at the 10 foot mark. Just an idea…
A couple tips for setting jumps at the correct angle. First see how they intersect with one another on the course diagram and verify that they do so on the actual course. If on paper a line drawn along the length of the jump bar extends to the first pole of the weaves, it should do so on the actual course. Another tip is to stand at the jump and hold the course map so it is parallel to the edge of the course, the angle of the jump on the map should match the angle of the actual jump.
For the tool happy among us, if you have a wall or walls around your ring you could use a laser tape measure to help put obstacles in the right location. I can’t do that easily with the trees surrounding my yard.
Hope these ideas help you get out there and set up more courses in our own backyard or training facility. Please share your suggestions for faster or easier home course building.
If you enjoyed this article won't you please:  Thanks!
Related Tags
Related Articles:
- My Home Dog Agility iPhone Recording Setup
- My Home Agility All Season Practice Area
- USDAA Please Require Four Paws on the Ground Before Calling an Off Course
- Rafael Quiñones "Minions" Practice Course - Video
- Emily Hurt - MC Jumpers - Course Analysis and Fun Video
- Sheri Boone MC Jumpers Competition Course - Video