Back Side of Jump Handling Combinations - Video
27 Mar 2012
22-Apr-2012: Added "Pull to Ketschker Take Off Side" to diagram & another video added
27-Mar-2012: Slow motion video added
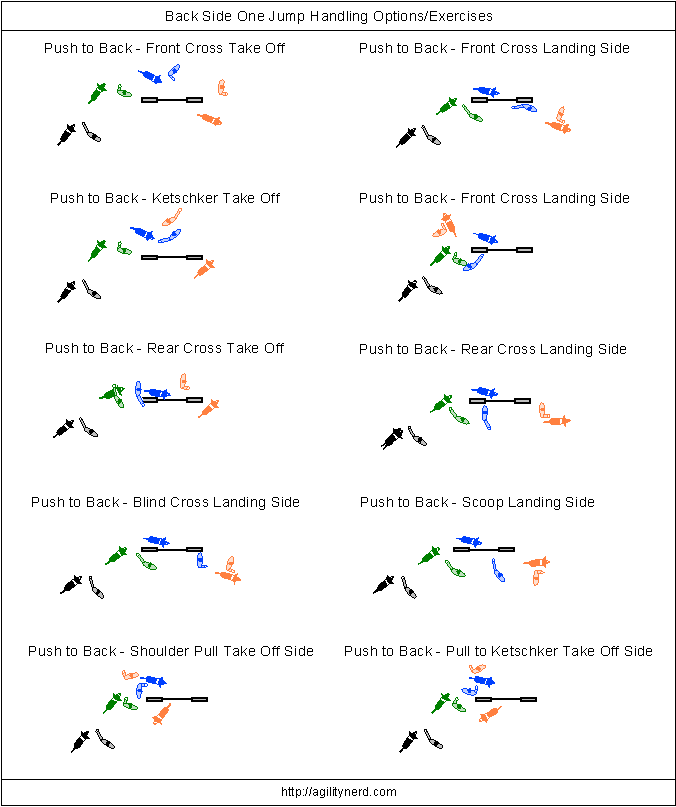
After giving my International Flair! Seminar I thought I’d put together a diagram showing the handling combinations possible for Pushing/Moving to the Back Side Handling the Quad Back Side - Patrick Bucher Course/VideoThe Connection Between Threadles and Back SidesBack Side/Back Side JumpBack Side of Jump Handling Combinations - Video of a jump and crossing/turning the dog. Here are the main combinations, we discussed the merits of many of them and worked on them:
For practice these combinations can be worked just like working any One Jump Drill Back Side of Jump Handling Combinations - VideoOne Jump Drills; you want to practice with different approach and exit angles. Ideally you should work these using spread jumps as well.
The Push to Cross combinations can take a little practice to get right. But they are combinations of taking the dog to the back side of the jump by Pushing, or by simply taking the dog to the back side, and then the crosses/pulls with which you are already familiar. So they just take some practice.
Here is video of Meeker and me trying each combination. Meeker is coming off of 6 weeks of rehab and has only just received the OK for a few 16 inch jumps at a time so my execution isn’t that great and I only took one or two attempts at each combination. Meek was pretty excited to be out there, now I just need to make sure I don’t let him “do himself a mischief”.
Here’s an updated video with slow motion added for each type of handling:
Here’s a video showing the “Push to Back - Pull to Ketschker Take Off Side” handling I’ve added to the diagram:
Here’s the original video w/o slow motion
Let me know what you think - questions/comments are welcome.
If you enjoyed this article won't you please:  Thanks!
Related Tags
Related Articles:
- Back Side Jump Wrap Exercise - Flyer Video!
- Pull Across Jump and Push to Back Side - Video
- Handling the Quad Back Side - Patrick Bucher Course/Video
- Using a Jump Wing as a Training Prop for Back Side/Threadle Slices - Video
- The Impact of Wings on Back Side Jump Wraps - Video
- Back Side Entry to 270/Training Opportunity - Video

