
Handling the Quad Back Side - Patrick Bucher Course/Video
31 May 2015
Swiss judge Patrick Bucher posted an interesting course that caught a lot of people’s attention because it contained four consecutive Back Side Handling the Quad Back Side - Patrick Bucher Course/VideoThe Connection Between Threadles and Back SidesBack Side/Back Side JumpBack Side of Jump Handling Combinations - Video jumps. Of course it got me thinking about how I might handle it…
I contacted Patrick and he kindly let me share his course:
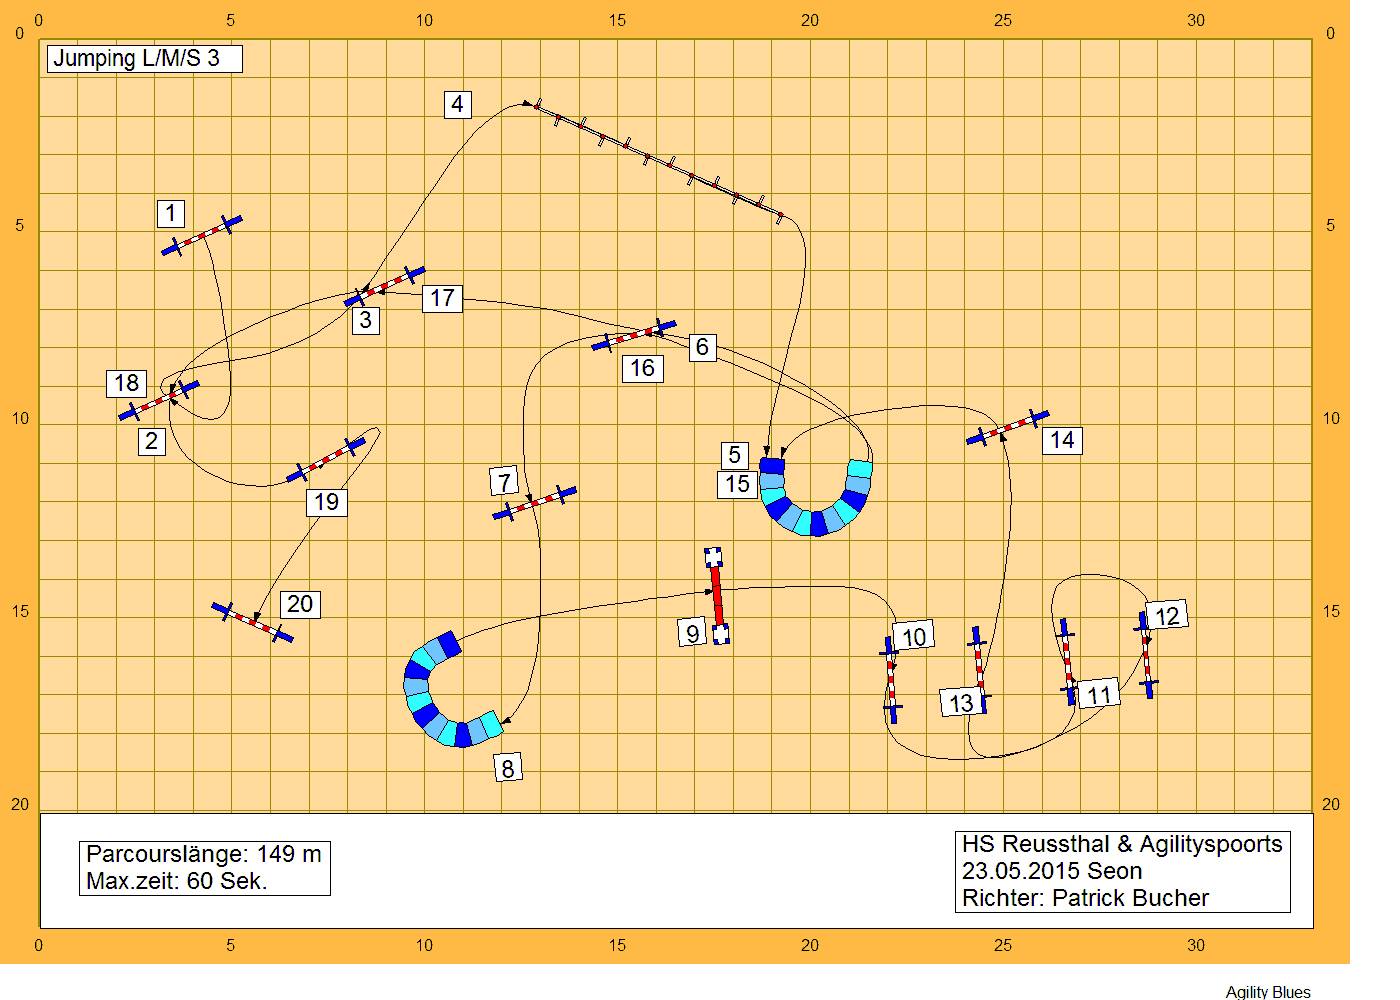
For folks not familiar with European courses the layout numbers are in meters and the path shown is the measuring path. The dog needs to take the obstacles in order but doesn’t have to follow the path drawn on the course. The spacing between each jump in the 10-13 section appears to be a little more than 2 meters or about 7 feet, at most 8 feet.
While all the focus was on obstacles 9-14 the course leading up to and following that section looks like fun also.
If you saw my article on the Holmberg Double you will notice the resemblance. You could think of jumps 10-13 as two interlaced Holmberg Doubles. So the handling possibilities are the same with the added challenge of bypassing a jump before taking the “second” jump of the Holmberg Double.
You might call this a “Double Holmberg Double”; I’m calling it a “Quad Back Side”.
When it comes to handling this section there are at least three approaches that came to my mind.
Two approaches have the dog following the dog path in the middle of the diagram above:
- At 10 and 11 take the dog to the take off side of each jump and use "Forced" Front Crosses Learning the Front Cross - VideoFront Cross to turn the dog toward and over the jumps. Then a Push to the Back Side Handling the Quad Back Side - Patrick Bucher Course/VideoThe Connection Between Threadles and Back SidesBack Side/Back Side JumpBack Side of Jump Handling Combinations - Video of 12 and a final Forced Front Cross could be used on the take off side of jump 13 to put the dog on the handler's right on the way to 14.
- Alternately 10 and 11 could be handled by pushing the dog to the back side while the handler stays on the front side of each jump. Then when the dog commits to the jump the handler Blind Crosses putting the dog on their outside arm on the way to the next jump. Then again it is a Push to the back side of 12. A final Push to the back side of 13 with or without a Blind cross completes the sequence.
The third approach follows the dog’s path in the right of the diagram. The dog is pushed to the back side of jump 10 and the handler cues a wrap around the wing of the jump. The handler can either Push to Back to Blind (aka “Curly-Q”) or Push to Back and keep rotating and pulling the dog around in a circle. Either way, the dog starts and ends on the handler’s left. This technique can be used on jumps 10 and 11. Then it is just a Push to the Back on jump 12 and the same ending as in either of the other approaches.
It may be easier to see what I’m talking about if you look at the video of these approaches:
As I mention in the video you certainly could mix and match the handling from all three approaches to come up with your own combination.
For all but the small dogs, I prefer the non-Curly Q approaches with the Push to Back to Blind Cross. For Flyer and me it gave him a smooth line, felt fastest and was the easiest for me to execute.
Big thanks to Patrick for allowing me to share his course and this challenge! If anyone has video of running the course in competition I’d love it if you’d post it in the comments!
If you enjoyed this article won't you please:  Thanks!