
Contact Hoop
08 Dec 2006
It seems when I train with Rhonda Carter I not only learn to be a better handler and trainer but I find she has come up with an idea for a new or modified agility training aid. It is funny because Rhonda doesn’t really use many aids when training. Six months ago I wrote about her idea for attaching bells to jump bars to detect ticked and dropped bars. At Dana Pike’s 2006 Fall Maintenance Camp Rhonda used her design for a hoop to train dogs to run the full length of their contacts (Dog Walk or A Frame) without jumping off prematurely.
While these “Contact Hoops” have been around for a long time, Rhonda had the clever idea of building a rectangular PVC pipe frame onto which she clipped a PVC weave pole guide to make the hoop. Her design makes this hoop very portable and if you already have weave pole guides they are trivial to make.
Unfortunately, I don’t have a picture of this type of weave pole guide. Hopefully my description will be sufficient. They are usually made from two PVC “T”s where a portion of the long part of each T has been cut off so that that cut side can be snapped onto a weave pole. The uncut part of the T (perpendicular to the weave pole) then has a piece of plastic tubing connecting it to the other cut PVC T. These clip on weave pole guides can be easily added/removed and slide up and down for different height dogs.
So Rhonda reused the weave pole guide by clipping it onto each side of her rectangular frame to make a hoop (she made the frame out of the same diameter PVC as her weave poles). She first trains the dog to run through the hoop on the flat. Then she places the hoop at the end of the contact obstacles and trains the dog to run through the hoop as part of their contact performance. Over time she fades the hoop.
Meeker, in his fearless manner, had taken to launching himself off the down contact of the Dog Walk so I thought I'd start using a Contact Hoop to shape his run down the contacts. I really liked Rhonda's clever approach so I thought I'd base my design on hers.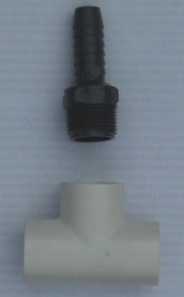
Well I had piles of PVC laying around from other agility equipment projects to make the rectangular frame but I didn’t have any weave pole guides (I’m a Weave-A-Matic user myself). So I went to Home Depot and found they have 3/4 inch PVC Ts with the perpendicular hole threaded for 3/4 inch pipe. They also had 3/4 male pipe to 1/2 inch male tubing adapters (tubing adapters are made to slide inside of plastic/rubber tubing and the ribs on the outside of the adapter grip the inside of the tubing). These threaded parts allowed me to screw the adapter into the PVC T to hold it in place. The picture to the right shows the T and the tubing adapter.
This adapter gave me the idea to use those foam pipe insulation “tubes” for my hoop and stick them on the male tubing adapters. It turns out the 6 foot long insulation tubes are just the right length to make a hoop. The tubes are cheap, soft, flexible and can be cut to length with a knife or scissors. The only “downside” of the tubes is they are made with a cut down their length (to allow you to install them over existing pipes). Fortunately the cut isn’t made all the way through so all I had to do was put some tape on the ends to keep the tube from starting to open up and they stay in one piece. Since all the plumbing stuff is in one aisle it was easy to try out a few ideas before settling on this solution.
In place of pipe insulation you could also use clear or colored 1/2 inch inside diameter plastic or rubber tubing to make the hoop (or whatever diameter fits snugly over the male tubing adapter). Clear tubing might make it easier to fade the hoop. Those foam “pool noodles” can probably used too (I don’t know if they have holes in them to accept the adapter or not) if they are long enough or you have shorter dogs.
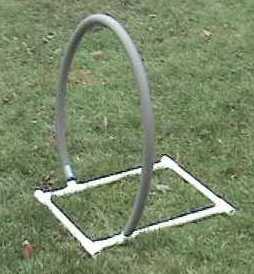
The picture to the right shows the assembled trainer. I chose not to cut the T’s to make them clip onto the frame. I just remove the hoop from the tubing adapter (it is a loose fit) when I transport the hoop to class. It’s about 16 inches wide (wider than a dog walk board) and about 24 inches long. The dimensions are just based on PVC I had around. The longer and wider you make the frame the more stable it will be in case the dog brushes against the tube. By making it wider than the dog walk board you can put the frame under the dog walk and have the board end sit in the opening of the rectangle. This was Rhonda’s idea too. That way if the dog does brush the hoop the frame stays in place. With my design the tubing will just come off the adapter to avoid any injury to the dog.
I didn’t glue any of the PVC parts together because they were a tight enough fit. I also didn’t want to because I might still play around with the length of the frame so I can use its length to always set it in the right location each time. I had to experiment with the placement of the hoop relative to the equipment so you could do the same and then cut the PVC to the correct size once your dog’s strides are where you want them.
I used PVC Ts at the corners because I was thinking I might want to put additional pieces of PVC off to the sides to keep the hoop flat on the ground if it was tipped up when the dog brushes the tube. It turns out these additional pieces haven’t been necessary so you could use 90 degree fittings instead.
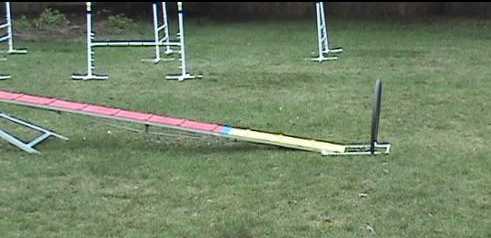
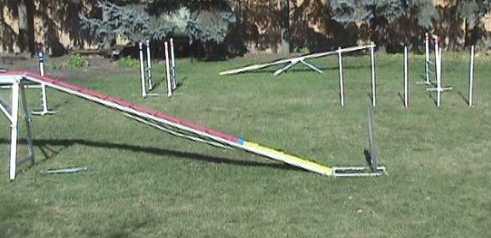
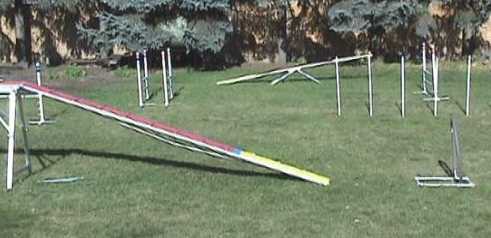
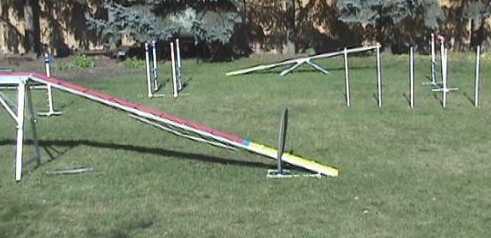
Here are some pictures of the hoop in various locations relative to my dog walk:
So a big thank you to Rhonda Carter for the original idea and design.
Alternate Designs/Names
I heard Anne Riba call this type of hoop a “Zoner Honer”. In that it helps “hone” a dog’s skills for the contact “zone”.
Another common design is to make a PVC “U” which is inverted (like a dog height measuring wicket) and has PVC feet (a T with two straight pipes) placed on the bottom to make it self standing. The U can then be positioned over the contact area and moved near and far from the contact. I’ve also see these upside down PVC U s made wide enough to straddle an A Frame for “honing” running contacts on the A Frame instead of using Stride Regulators. Here is my article on making a Contact Wicket.
If you enjoyed this article won't you please:  Thanks!