
Window Film For Cooler Cars
25 May 2008
Now that the heat of summer is coming I’ve started looking for ways to keep our dogs cooler and safer while traveling in the car. Like many agility folk who won’t make the jump to the mini van (or church bus as my friend Tony with 10+ dogs wants :^) I drive a Honda Element. It has slightly tinted windows in the back and on the rear sun roof. The rear sun roof ends up right over the dog’s crates and the sun comes right in on the dogs. There isn’t an opaque cover for the sun roof glass to keep all the light out.
Aftermarket window tinting is a very common thing to do in the Southwestern US where the heat of the sun coming into the car makes for an instant oven. One thing you can do yourself is apply window darkening film to your vehicle’s non sliding windows. I got the idea from my friend Steve who put the film on the rear sun roof window on his Element. He kindly gave me his leftover film so I thought I’d give it a try.
Before you try this yourself check your local legal codes. For law enforcement safety it is illegal in some jurisdictions to tint some windows on the vehicle and the amount of tinting may also be legislated.
I read the owner’s manual for removing the sun roof. It was pretty easy. Then it was just a matter of following the film’s instructions. Wash the inside of the window with soapy water and cut the film to size (I just cut it to rough size):
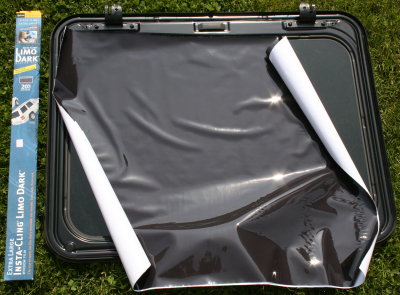
Then I used a little water sprinkled it on the glass, and placed the film on top of the glass. You can lift and reposition the film to get it in the right location. Then using a credit card or squeegee work from the middle of the window to the edges pushing the air bubbles and water out from under the film. Then using a very, very sharp (brand new!) razor blade carefully cut the film at the edge of the window. Be careful not to cut the rubber gasket that seals the glass in to the frame. I found using the squeegee to hold the film down and to act as a straight edge made cutting the film on the straight sections easy. The rounded corners were trickier and my cuts weren’t too smooth.
Here is the completed installation along with the tools I used. I squeegeed out the last couple bubbles before I installed it. It turns out if you leave the film a little too long it will pucker, so I had to trim a tiny sliver off in a couple places.

This was a pretty simple job, it took under half an hour including taking pictures. Once I reinstalled the window I could definitely see the difference. While this was quick and easy, I think I would have a professional install the film on windows that I had to look out of or windows that moved up/down, since it would bug me if I had to see air bubbles or crooked cuts.
Stay cool out there!
If you enjoyed this article won't you please:  Thanks!