
How Would You Handle It? - Sequence 2
10 Jan 2008
Updated with handling discussion - 14-Jan-08
This “How Would You Handle It” is a middle sequence of a longer course I ran at Anne Riba’s Apex Agility this past summer. It is a pretty straightforward sequence with a couple handling options. Unlike the last course, in this course their are no handler restrictions to impede your handling options. The only restriction is you have to take the A Frame with the dog on your left (as that would have been the only option in the full course) as shown by the green handler labeled START in the diagram below.
Sequence 2

Some Handling Solutions
The errors on this sequence involved going off course to a jump. There were three primary off courses as shown in red in the figure below.
The obvious off course from the triple jump to the wrong side of the tunnel.
A few dogs took the off course jump going toward the weaves after the double.
By far the most common error was dogs taking the unnumbered off course jump after jump 5 instead of the tunnel.
Some Solutions
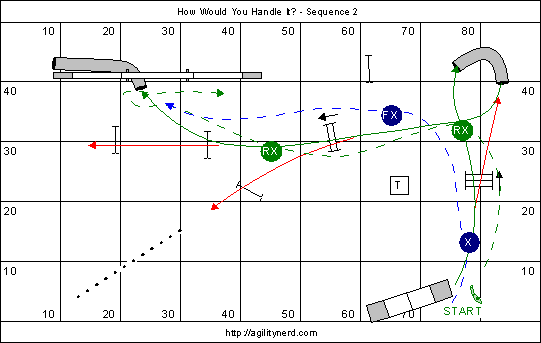
In the diagram I’ve shown the two primary handler paths I remembered: one in green and one in blue. Of course you could start on either and switch to the other after the triple for another permutation.
Blue Line
If I recall correctly most handlers chose the blue path. At the start of the blue path the handler crosses on the take off side of the triple jump. There are some handlers who are afraid to cross anywhere around a double or a triple jump for fear of a dropped bar. But if the handler practices their execution, gives clear cues to the dog, and gets out of the dog’s way there is no need to fear this situation.
Most handlers using this approach Rear Crossed Learning the Rear CrossRear Cross to change sides on their dog and give a slight turn to the dog’s path toward the left side of the tunnel. Some handlers with a stopped contact position used a Front Cross Learning the Front Cross - VideoFront Cross instead. It was about 35 feet from the A Frame to the tunnel so most dogs were really moving and the handler didn’t have too much time to mess around once the dog was on their way over the triple.
With the dog on the handler’s right it was a slight Pull to get the dog into the correct side of the tunnel. The more distance the handler could send their dog to the tunnel the further ahead they would be of the dog coming out of the tunnel. Most handlers tightened the dog’s line coming out of the tunnel toward the double by using a Front Cross and accelerating toward the double. An RFP would also work if the handler had already crossed. A Blind Cross would work just as well too.
The fatal flaw for over half the teams on this path was using a shoulder Pull to turn the dog from jump 5 into the tunnel. It really depended on the speed of the dog and the handler’s position. The dogs were at full speed after coming from a tunnel over the double jump. Handlers that didn’t get moving when their dogs were in the tunnel were either behind or just next to their dogs at jump 5. For those dogs the shoulder pull without the handler deceleration cue wasn’t enough to turn them into the tunnel. Many of the dogs that didn’t take the off course still had a wide turn and doubled back into the tunnel.
A couple handlers, in an effort to shape their dog’s turn between jumps 4 and 5, tried to influence their dog’s path by getting ahead and using a Post Turn prior to jump 5. I think one resulted in the push to the off course jump facing the weaves.
Green Line
Starting with the green line the handler can Rear Cross on the landing side of the triple jump after Pushing on the dog’s line toward the left side of the tunnel. This requires the handler be slightly ahead of their dog, so they can push, and then allow the dog to go past them into the tunnel. This is a little unorthodox in that the handler runs a little longer distance than those crossing on the take off side of the triple. But it did take the dog’s view of the off course side of the tunnel out of the equation.
An interesting benefit of choosing to Rear Cross on the landing side of the double was the handler didn’t need to be in much of a hurry once the dog was in the tunnel. They could take a position just a little way down course from their Rear Cross after the triple and use that position to influence their dog’s line coming out of the tunnel.
The Rear Cross on the landing side of the double worked beautifully to turn the dogs into the tunnel. The speed and extension of the dog brought them ahead of the handler and the handler’s movement to the dog’s other side turned them straight into the tunnel.
For either the blue or green lines handlers used their favorite Tunnel to Dog Walk Wrap handling. It was a good place to use the “short cut” method since you could just stay at the tunnel entrance and be ahead of your dog over the dog walk.
Conclusion
I was one of the folks who ran the green line. Which was unusual for me. I tend to focus on always driving to stay ahead of my dog and, all things being equal, I usually prefer a Front Cross to a Rear Cross. But on this course, at least for the turn to the tunnel, handling that turn from behind worked best for us.
It is hard to “see” what can really go right/wrong on a course from just a diagram. And the teams I saw running this course might not be anything like your team. But I hope you enjoyed this little mental exercise!
If you enjoyed this article won't you please:  Thanks!