
Learning the Rear Cross
17 Aug 2006
The Rear Cross is one of the building blocks of Agility handling. It can be used on almost every Agility course. Like the Front Cross Learning the Front Cross - VideoFront Cross, the Rear Cross can be used to change from one side of your dog to the other and/or change your dog’s Lead Leg to initiate a turn. Here is my Rear Cross definition.
I’ll also present the Walking the Line and Zig Zag exercises for practicing this skill.
A key point to remember about the Rear Cross is that it requires the handler to be patient enough to let the dog pass them before turning the dog or changing sides. The handler that initiates the cross too early will just Push the dog away from them without getting the dog to pass across the handler’s path.
Start Without Your Dog!
Many beginning handlers are too self conscious to practice their handling movements without their dog. But please believe me that you’ll be more successful if you get the movements drilled into your muscle memory before you add your dog into the process. You’ll only confuse yourself (or even worse - confuse your dog) if you start off right away with your dog.
I like to teach the Rear Cross using three steps. Let’s start first with our imaginary dog:
- Move forward a few steps and as you plant the leg nearest the dog, draw the dog past your near side leg using the arm nearest the dog as you continue to step forward with your opposite side leg.
- As the dog passes your knee bring up your opposite side arm to turn the dog away from you. Your weight is now predominantly on your opposite side leg.
- Once the dog turns away from you step behind the dog with the (formerly) inside leg. This will bring you up alongside your dog with it on your opposite side.
Believe me it is easier done than said!
The pictures below show the handler position after each step for Rear Crosses starting on the handler’s left and right. Imagine the dog is moving forward and his nose is right where the finger of my lead arm is pointing (obviously my lead arm changes as I change the dog from one side to the other).
| Step | Dog On Handler's Left | Dog On Handler's Right |
|---|---|---|
| Start | 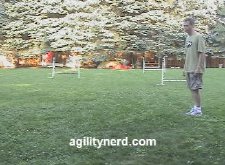 | 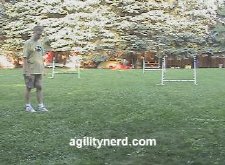 |
| Step 1 | 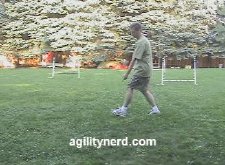 | 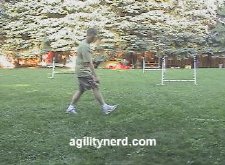 |
| Step 2 | 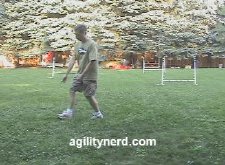 | 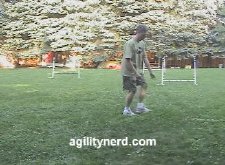 |
| Step 3 | 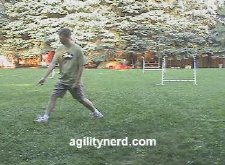 | 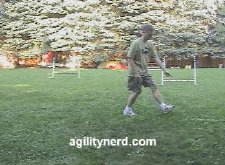 |
| Complete | 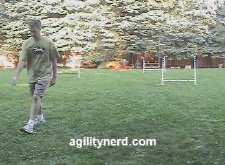 |  |
I have to admit I had trouble doing these steps without a dog; I cue my motions off my dog and once I started thinking about what I was doing that I was confusing myself…
As I’ll demonstrate in a future article, it is important to use your arms as I describe above. It is possible to signal the Rear Cross using only the Inside Arm or only the Outside Arm. Using only the Inside Arm to turn the dog away from you can be confused with the similar arm motion used to send the dog forward (a “Go” or “Go On” cue) to an obstacle in front of the dog/handler. Consequently, using the Inside Arm to turn the dog can result in a dog that veers off course mistaking an slight turn of the inside arm wrist as a signal to turn away from the handler instead of going forward. Consequently, “short cutting” the Rear Cross arm signals to use only the Outside Arm is less risky (at least I can’t think of any issues at this time).
Add Your Dog
Please only add your dog when you can do the steps without consciously thinking about them.
Start with a very high value treat or toy in your hand closest to your dog. You’ll use this treat to help move your dog ahead of you, keep your dog aware of your lead hand, and reward your dog for following your lead hand. That treat/toy is serving triple duty!
As you go through the three steps you can keep your treat arm directly in front of your dog. As you draw your inside arm forward your reward will draw your dog forward - the smell of the treat should keep your dog focused on your lead hand. You may find that keeping a treat in each hand and giving up the treat after your first step is easier. Then you can use your other hand (your new lead hand after the cross) to lure your dog through the turn.
Once you’ve done this successfully a few times you should be able to get rid of the first cookie and only reward your dog with a cookie from your final lead hand at the end of the cross. I like to use cookies for this drill with novice dogs for a number of reasons: it keeps your dog focused on you and your hands and gets your dog used to being close to you while you move. It also helps make you the most interesting thing on the course and reinforces the notion that you are the source of all good things - like cookies and toys.
For some handlers this is best learned by passing a cookie from one hand to the other. You’ll start with the cookie in the hand nearest your dog and as you take your step forward with your outside leg you’ll transfer the cookie to you other hand. At the third step you’ll have your new inside arm extended with the cookie and reward your dog.
The photos below show the three steps with Meeker:
| Step | Dog On Handler's Left | Dog On Handler's Right |
|---|---|---|
| Starting Position | 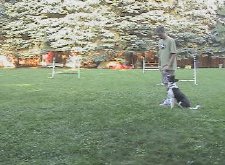 | 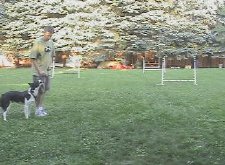 |
| Step 1 | 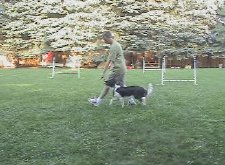 | 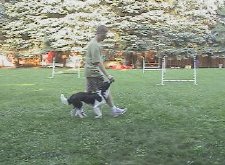 |
| Step 2 | 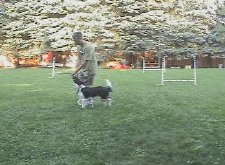 | 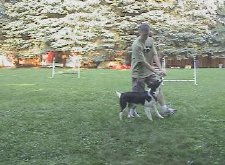 |
| Step 3 | 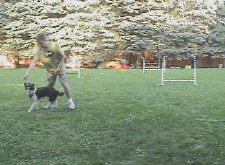 | 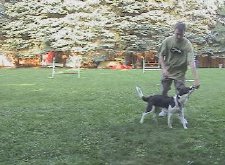 |
| Complete | 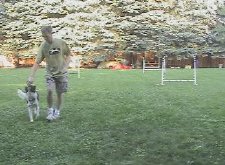 | 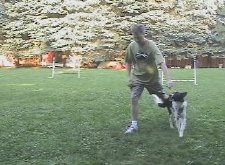 |
Troubleshooting
There are two main issues that affect handlers training this maneuver: the dog doesn’t move ahead of the handler or the dog continues ahead of the handler and doesn’t turn.
To get your dog to move past your inside leg, passing a high value reward from the inside arm to the outside arm is usually sufficient.
For the dog that doesn’t initiate it’s turn using the outside arm it can be helpful to work on Outside Arm turns separately before incorporating them into the Rear Cross. When learning Rear Crosses on the flat your body language of stepping behind the dog can’t always be used to start the dog’s turn. Once the dog has started to turn the rotation and motion of your body completes the dog’s turn.
These problems are exacerbated by long dogs and/or short armed handlers. Both can benefit from learning the Rear Cross by taking the dog through a full 180 degree turn when performing the cross as shown below in the “Walking The Line” exercise. I learned this exercise from Dana Pike.
In this exercise the handler walks in basically a straight line while turning the dog using 180 degree Rear Crosses at each end of the line. So the dog changes from one side of the handler to the other without the handler having to change sides of the dog.
Walking The Line
Next Steps
Once you can Rear Cross to each side you can start work on performing them back to back. You can chain the crosses right then left then right then left over and over. You should be able to work your way down your yard or practice field in a zig-zag pattern changing from one side of your dog to the other. I call this the Zig Zag Rear Cross Exercise:Zig Zag Rear Cross on the Flat Exercise
I used tunnel sandbags as reference points in the video so I would stay in the frame of the video camera; you don’t need markers on the field although it is helpful in a class situation.
As you get more proficient you can start running with your dog instead of walking. Then add jumps at each cross location and perform the Rear Cross on the take off and landing sides of the jumps. The key difference in these cases is where the dog turns.
If you find your dog spins on the landing side of the jump when you perform your Rear Cross on the take off side of the jump it is likely your dog did not actually turn before taking the jump and then guessed which side you’d be on when they landed. Try initiating your Rear Cross further from the jump so your dog is on their new Lead Leg before their prefered jump take off spot.
Zig Zag Rear Cross on Take Off Side Exercise With Jumps
Zig Zag Rear Cross on Landing Side Exercise With Jumps
Alternate Training Methods/Thoughts
Some folks start teaching the Rear Cross over a jump. Specifically, they train the Rear Cross on the landing side of the jump. This method gets the dog to move ahead of the handler and the handler can easily step behind the dog as it takes a stride upon landing. I prefer to train it on the flat so it can be taught to dogs that are too young to be jumping. It also lets you focus on the cross and not be distracted by whether or not the dog performs the jump properly and whether you are expecting the dog to change leads before or after the jump.
I believe Mary Ellen Barry trains her students to not use any arm/hand motion when performing the Rear Cross. The movement of the handler behind the dog from one side to the other is sufficient to turn the dog.
I hope this article helps you get started with Rear Crosses. Please let me know if you have any questions or comments.
If you enjoyed this article won't you please:  Thanks!