Single Sided Threadle Handling
30 Jan 2007
Obsolete Article
Heads up! This article is old and I don't think its content is useful anymore. It's here for historical reference only.
I learned this technique from Rachel Sanders at Dana Pike’s “2006 Fall Maintenance Camp”. It was remarkable that the vast majority of dogs understood the handling on the first attempt and the handler’s found it much easier to execute correctly than their normal handling. I subsequently taught her approach to over twenty intermediate handlers, all of whom “got it” immediately and used it running this course
Most importantly I’d like to express my gratitude to Linda Mecklenburg who not only replied immediately to my email questions, she drew Clean Run Course Designer diagrams detailing her how her handling applies to Threadles, and graciously proofread this article. Thank you Linda!
Traditional Threadle Handling
You might want to read my article on Traditional Threadle Handling methods to see the other handling methods against which I’m contrasting this one.
Coming At the Problem From a Different Direction
The traditional Threadle handling methods I described all give the dog the cues needed to have the dog take the first jump, turn back to the front of the jump, come between the jumps, turn toward the second jump, and take the second jump.
But if you look at the dog’s path you could also break up the behaviors differently. What if you view the first jump and turning back toward the front of the jump as a Jump Wrap Jump Wrap Handling - With VideoJump Wrap Handling TipsJump Wrap/Wrap? As Linda put it: “The trick is to cue the first jump so the dog doesn’t even know he is going through a gap”. Once the dog has wrapped the first jump you just need to send the dog over the next jump.
OK sounds pretty straightforward, a Jump Wrap followed by a send over the second jump. Lets see what our options are for these two behaviors.
Jump Wrap
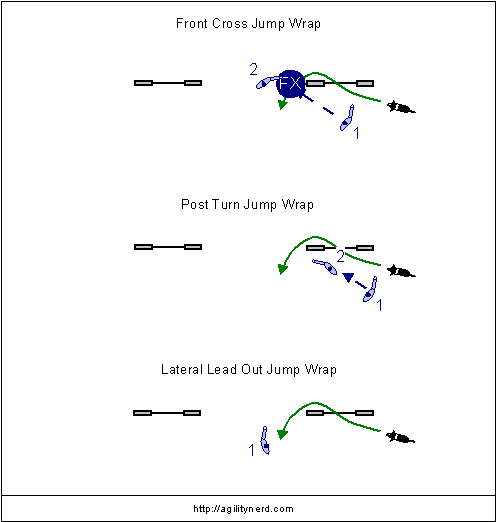
Jump Wrap handling Jump Wrap Handling - With VideoJump Wrap Handling TipsJump Wrap/Wrap has been on myTo Do list for a while now, eventually I'll have more to say about them, for now let's consider three possibilities: a Front Cross Jump Wrap, a Post Turn Jump Wrap, and a Lateral Lead Out Jump Wrap (Linda call this a Lead Out Push). See the diagram below for the handler's motion for each of these:Jump Wrap Handling Options

Well the Front Cross Jump Wrap is just what we would do if we were starting out to use Front Cross Learning the Front Cross - VideoFront Cross to Front Cross Threadle Handling and the Post Turn Learning the Post TurnPost Turn/Shoulder Pull/Pivot Turn puts us behind our dog (in this case not an optimal place to be - although still “do-able”). Interestingly the Lateral Lead Out allows the handler to stay on the take off side of the first jump and still be ahead of the dog, and what if you did it while moving (so it wasn’t a Lead Out)? Sounds like an idea… Of course it fits Linda’s notion of cueing the dog so he doesn’t know he is even going through a gap; to the dog it is just a Jump Wrap.
Send to The Jump
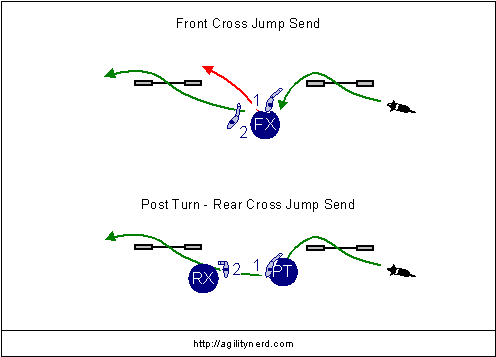
Assuming we’ve chosen a Lateral Lead Out to handle the first jump how will we send the dog over the second jump? The handler could Front Cross Learning the Front Cross - VideoFront Cross and put the dog on the handler’s other arm. This has the disadvantage of possibly pushing the dog to the back side of the second jump or, to avoid that possibility, the handler has to pull the dog substantially further forward of the take off side of the second jump. Or the handler could wrap the dog entirely around their body with a Post Turn and then Rear Cross Learning the Rear CrossRear Cross on the take off side of the jump; again putting the handler behind the dog. These two options are shown in the diagram below:
Jump Send Handling Options

This is a place where Linda breaks with traditional handling views (for all the right reasons). She just backs up until she can direct her dog over the next jump. “Back up?” you might say, “we’ve always heard to never back up when handling” and that was my first response.
Here is her reasoning. In Linda’s system she would cue a 180 degree wrap and front cross with an outside arm. Additionally, she puts her dog on her arm opposite the jump to bring her dog past without him jumping it. In the Threadle in the diagram she’d use her left arm to cue the first jump (which requires a 180 degree wrap) and leave the dog on that arm to draw him past the plane of the second. There is no reason to change sides. To give the dog direction she must move, which in this case is to just back up in the direction she wants the dog to go (toward the second jump). She then uses that same arm to initiate the cue to the second jump.
If you handle the first jump using the same cues as you would to perform a Lateral Lead Out you can also stay on the take off side of the jumps throughout the Threadle. Your backward motion draws the dog to you as you move to the take off point for the second jump. Your near side arm is then used to cue the second jump.
Putting It All Together
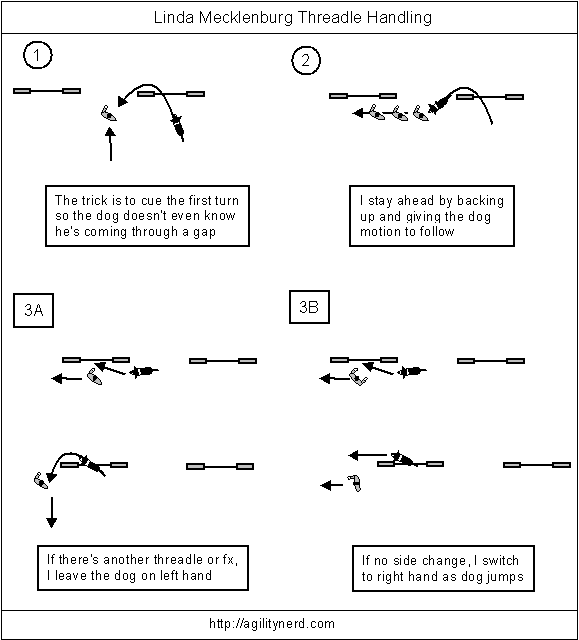
Here is the diagram Linda was kind enough to draw and email to me showing the two steps we just discussed (slightly reformatted to fit online):

In the case where the course continues on the take off side of the second jump (step 3A in the diagram above) Linda keeps using the same arm that cued the Jump Wrap/Lateral Lead Out on the final jump. This signals the dog to wrap the jump and keeps the dog on the handler’s left arm. This allows for handling a three jump Threadle (just repeat as for the first two jumps) or for taking the dog toward the bottom of the diagram with a Front Cross.
I was initially confused when Linda called the wrap of the final jump in 3A a Front Cross. Think of it this way: if your dog was on your right hand on the way to the final jump you’d have to Front Cross to put your dog on your left hand after the jump. So even though you are backing up over the final jump you can think of the dog as
technically being on your right arm and then after the jump the dog is on your left arm; just as if you did a Front Cross over the jump.In step 3B in the diagram Linda would turn to her left to face forward on the take off side of the jump as the dog commits to the jump to put the dog on her right arm. You might do this if the course continued to the top or left of the diagram. In Linda’s thinking this
isn't a side change (cross) because had you been moving forward toward the final jump the dog would have been on your right arm both before and after the jump. When moving backward your dog ends up on your right arm after the jump; the equivalent of not changing sides had you been moving forward.What Can Go Wrong?
When learning this handling I like to give handlers two “landmarks” to help them (Linda pointed out that these aren’t necessary if you are correctly using her handling system).
- The handler shouldn't be at or past the standard of the second jump when calling the dog over the first jump.
- The handler should stay on the take off side of the jumps.
If the handler starts at or past the second jump they can’t be using their motion to draw the dog to the take off side of the second jump. Only after the dog is committed to the first jump should the handler’s motion cue the dog to the front of the second jump and not support a line to the back side of the second jump.
If the handler doesn’t get to the take off side of the second jump the dog won’t be able to jump it. Now you don’t have to remain on the front side of the first jump, your backward motion does draw the dog to you, but I’ve found it easier to move straight down the front of the jumps rather than drawing the dog backwards along the curved Threadle path.
Handling In Action
I shot video of Meeker and me learning this handling and have posted it below. In these clips he’s been learning the game for about 8 months. But we have been working on One Jump Drills Back Side of Jump Handling Combinations - VideoOne Jump Drills throughout that time. So to him the first jump is just like the Lateral Lead Out exercise. In the video we are working a three jump Threadle starting from a lead out and then repeating again to a third jump. That way you can see that this handling can also be used when you are already in motion. I also show both of the endings of the Threadle and show the handler error where I’ve started the Threadle passed the plane of the second jump.
So give this Threadle handling a try. I think you’ll be pleasantly surprised with how quickly your dog understands what you want him to do. I’ve been using this handling for a couple months now and it always works nicely even when preceded by a fast moving sequence. So my heartfelt thanks to Rachel Sanders for presenting this method of Threadle handling so clearly at camp and especially to Linda for her help in presenting this wonderful outcome of her handling system.
If you enjoyed this article won't you please:  Thanks!
