V-Set Handling Alternatives
05 Dec 2004
As I was writing up my V-Set Definition I thought it might be worthwhile to discuss some alternatives to using the V-Set. The primary argument against the V-Set is that it trades time and distance for accuracy. Using the V-Set makes for a slightly longer and possibly slower path for the dog. Worthwhile alternate strategies should allow the dog to make the best possible time over the course. I’ll try to point out some of the risks of each alternative, but every handling option for every sequence has some risk, ultimately it is a matter of knowing you and your teammate’s abilities.
In general these alternatives require a more practiced team, or at least a dog with more Handler Focus than Obstacle Focus. That is because success on a course that might be considered for use of a V-Set requires the handler to be able to turn the dog to avoid an off course obstacle. I’ll reuse the same course opening, reproduced below, with the off course jump indicated by an “X”.
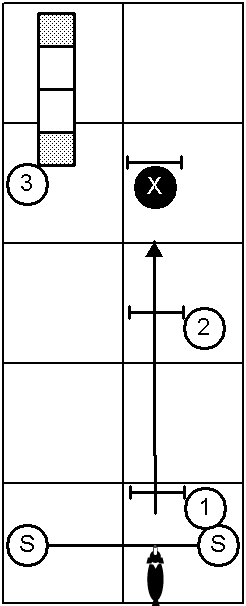
There are at least four ways of handling the turn without using a V-Set. One of these approaches turns the dog after jump 2 and the other three allow initiating the Lead Change as early as the take off side of jump 2.
Front Cross
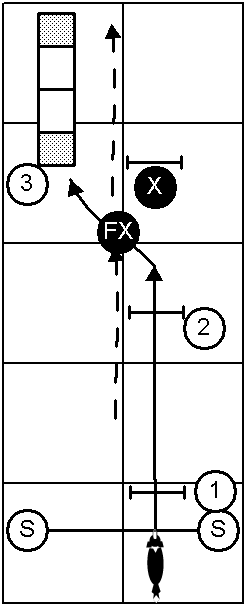
Using a Front Cross Learning the Front Cross - VideoFront Cross is a pretty common handling approach for this sequence. This is diagrammed below.
In addition to the off course, the risk of this approach is a dropped bar at jump 2. This is likely due to a handler worried about the off course who “chops” downward with their new lead arm while the dog is still in the air over jump 2. This is one of the critical aspects of executing a Front Cross; don’t introduce the cross signal while the dog is over the bar. Either initiate the cross on the flat as the dog lands or a more practiced team can Pre-Cue the Front Cross when the dog is on the takeoff of the jump; alerting the dog that a Front Cross will occur after jump 2.
There is also the issue that the handler has to be at the landing side of jump 2 without accelerating the dog over the jump. This is another argument for Pre-Cueing the Front Cross, the dog should collect it’s stride as it changes leads before jump 2.
Lead Out
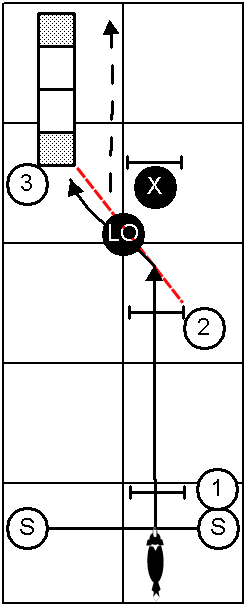
A Lead Out on the Handler Line Using the Handler Line - Front/Rear/Blind Cross LineHandler Line - Front/Rear/Blind Cross Line is equivalent to the handler standing in the position they would be in at the midpoint of the Front Cross (left arm extended with the handler’s body half turned towards the A Frame). See the diagram below. This approach requires the dog to understand being directed over two jumps when coming towards the handler. This is also a Pre-Cueing maneuver so the experienced dog should change leads before taking the jump, resulting in a better line to the A Frame.
Again the risk is a dropped bar on jump 2. The handler has to hold their ground and not drop their lead (left) arm until the dog is fully committed to the jump. Since the handler moves less than for the Front Cross approach there is less risk with the Lead Out (given an equally proficient dog).
Rear Cross Between Jump 1 and Jump 2
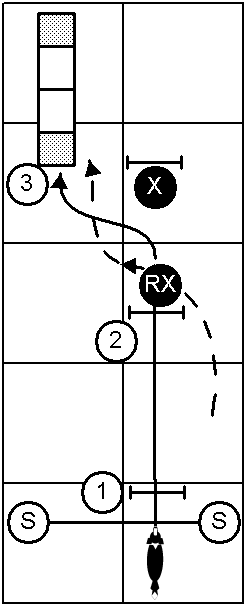
A Rear Cross Learning the Rear CrossRear Cross after jump 1 is another popular solution to this sequence. It has the advantage of changing the dog’s lead before jump 2, again providing a tighter turn and reducing the risk of an off course.
The primary risk of this approach is the dog not turning back to the handler upon landing. But if the handler gets the Lead Change before the jump a dog’s natural tendency is to curl back to the handler. It is also possible that a very late or clumsy Rear Cross could result in a dropped bar on jump 2. Either problem is a training/timing issue that can be solved with some practice. I’d consider this approach the least risky of all.
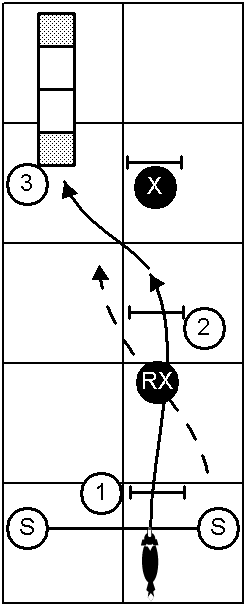
Rear Cross After Jump 2
The final approach is to Rear Cross on the flat after jump 2. I view this as the riskiest of the approaches. It is least likely to cause a dropped bar but the most likely to cause an off course at jump “X”. Upon landing after jump 2 a medium sized dog is only 2 strides away from taking off for the “X” jump. So the handler has to time the cross just right.
As for the Front Cross approach, there is also the issue that the handler has to be at the landing side of jump 2 without accelerating the dog towards and over the jump. The handler really needs to signal a short stride to the dog so it doesn’t sail over jump 2. This can be accomplished by a significant lead out and a slight slowly by the handler as they approach jump 2. But unlike the Front Cross case, there is less the handler can do to control the dog’s path when they are behind the dog, as is required to perform the Rear Cross.
Lastly, if the dog was successfully turned I’d think the dog’s approach to the A Frame could be quite sharp. The dog would have to turn back to their right close to the base of the A Frame loosing momentum for the ascent. In the worst case, the dog might bail off the side of the A Frame.
I hope this discussion of alternate handling options for opening sequences that might be considered for a V-Set was useful. I’d love to hear your comments.
If you enjoyed this article won't you please:  Thanks!
