
Dana Pike Advanced Class Course - Right Cross At The Right Time
25 Nov 2004
Last week Dana Pike had us run a course that had some nice subtle aspects to it. I especially liked it because it highlighted some of the considerations for choosing between Front Crosses Learning the Front Cross - VideoFront Cross and Rear Crosses Learning the Rear CrossRear Cross on a course. It was also timely in that it had a good use of an Inside Arm initiating a Rear Cross when I was just writing up my Inside Arm definition.
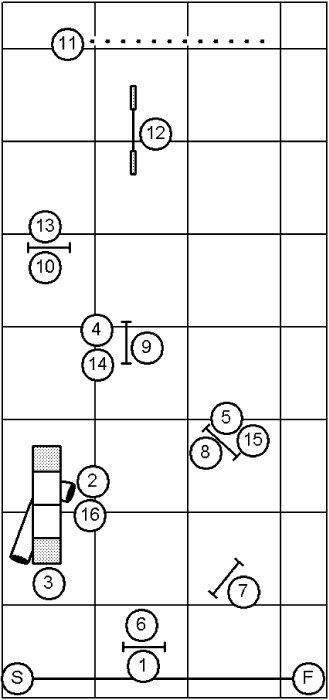
The course is shown below. I added jump 1 before the tunnel so this course is easier to setup if you ever wanted to time runs over a start finish line.
Running the Course
The opening was straightforward. Most handlers lead out on the Handler Line Using the Handler Line - Front/Rear/Blind Cross LineHandler Line - Front/Rear/Blind Cross Line between the first jump and the tunnel. Dana pointed out that it is worthwhile to allow the dog to take a couple strides out of the tunnel before turning toward the A Frame. The extra distance travelled by the dog is more than made up for by the extra speed the dog has to get over the A Frame.
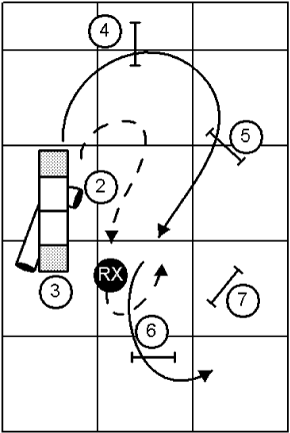
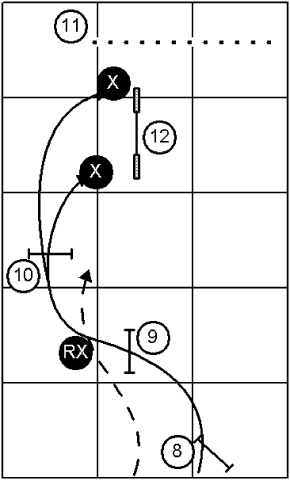
The next interesting section of the course was turning the dog to its left from jump 6 to jump 7. There were two approaches for getting the dog to turn and change it’s Lead Leg: either Front Cross or Rear Cross. These approaches are shown in the diagrams below.
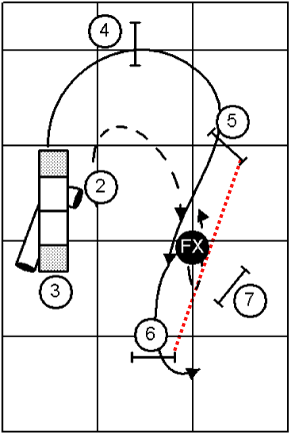
Front Cross handling was difficult if the handler had to “baby-sit” the A Frame downside contact. That was because in order to execute the Front Cross the handler to get to their position on the Handler Line (shown as a red dashed line) over the same distance that the dog would travel. For a fast dog (or a slow handler) this was almost impossible. But if the handler could establish enough Lateral Distance from the dog on the downside contact this handling had the substantial benefit of putting the handler further ahead of the dog after jump 7 than a Rear Cross. If I recall correctly, only a few handlers used this handling.
Rear Cross handling was easier to perform since the handler stayed with the dog through the jump 4 and jump 5 sequence. If the handler went pretty far towards jump 6 they could Rear Cross giving the dog an angled approach to jump 6. The angled approach put the dog in a great position with respect to jump 7. After this insight from Dana, this was the most common handling method used. While this was a “true” Rear Cross, the dog was brought forward of the handler with the inside arm and the handler then crossed behind the dog, the handler was really just turning the dog with the inside arm and “cutting and running” to get ahead of the dog for the next part of the sequence.
Regardless of the cross performed, the fastest performance was achieved if the dog changed its lead before jump 6. But the handler really had to weigh the benefits of each approach. The Front Cross put the handler further ahead of the dog, but gave the dog a straighter approach to jump 6. Consequently, after jump 6 some dogs would wrap tightly around the upright and bypass jump 7 (and the handler wasn’t in a good position to Support the Dog’s Line) to address this problem. The Front Cross also presented the possibility of an off course to the A Frame. The Rear Cross set the dog on a flatter approach to jump 6 which almost “guaranteed” the dog would land and stride toward jump 7; so when the dog continued turning it would see jump 7 right in front of it. But then the handler had to run further and faster to get ahead of the dog for handling the 8-9-10 sequence. Turning the dog at jump 5 before the Rear Cross also presented jump 7 as a possible off course.
The handling for the 8-9-10-11 sequence was actually determined by the handler’s need to manage the weave entrance. The relatively long distance to the right angle weave entrance meant that dogs who were ahead of their handlers and who didn’t have distance skills would tend to curl back to the handler. These problems are illustrated in the Rear Cross handling shown on the right below.
To keep the dog from curling back, the handler needed to be even with or ahead of the dog at jump 10 in order to push on the dog’s line (push the dog to their left) to give the dog space to Find the Entrance to the weaves. Consequently, this “requirement” influenced handling on the previous obstacles. In this sequence it meant that handlers had to execute a Front Cross between jumps 8 and 9 (as shown in the diagram below on the left). The Front Cross put the handler both ahead of the dog and on the dog’s right at jump 10. Consequently, the handler had to be ahead of the dog at jump 8 which influenced whether or not the handler used a Front or Rear Cross at jump 6. This is a great example of how later handling decisions (and team abilities) can have a ripple effect on the handling of prior obstacles.
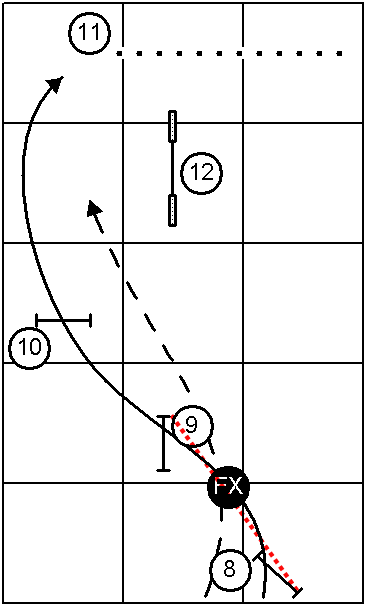
It should be noted that these weren’t the only handling methods used. Some teams executed the Front Cross between jumps 8 and 9 and Layered jump 12 (were on the right of jump 12) as the dog took the weave entrance without nearby handler assistance.
I won’t diagram the handling for sequence 13-14-15-16. There were two successful approaches: Front Cross between 14 and 15 followed by a Front Cross between 15 and 16 or Rear Cross between 14 and 15 and Rear Cross between 15 and 16.
I enjoyed this course so much I set it up again during ring rental this week at the new For Your Canine facility. If you set it up yourself, experiment with the distances (in both dimensions) between the 4-5-6-7 jumps and see how it might change how you handle the course. Similarly, further “stretching out” the 9-10-11 sequence and moving the weaves right to left would be interesting too. Dearlove Agility students can expect to see a variation of this course in the future :^).
Dana thanks for keeping us thinking on the course…
If you enjoyed this article won't you please:  Thanks!