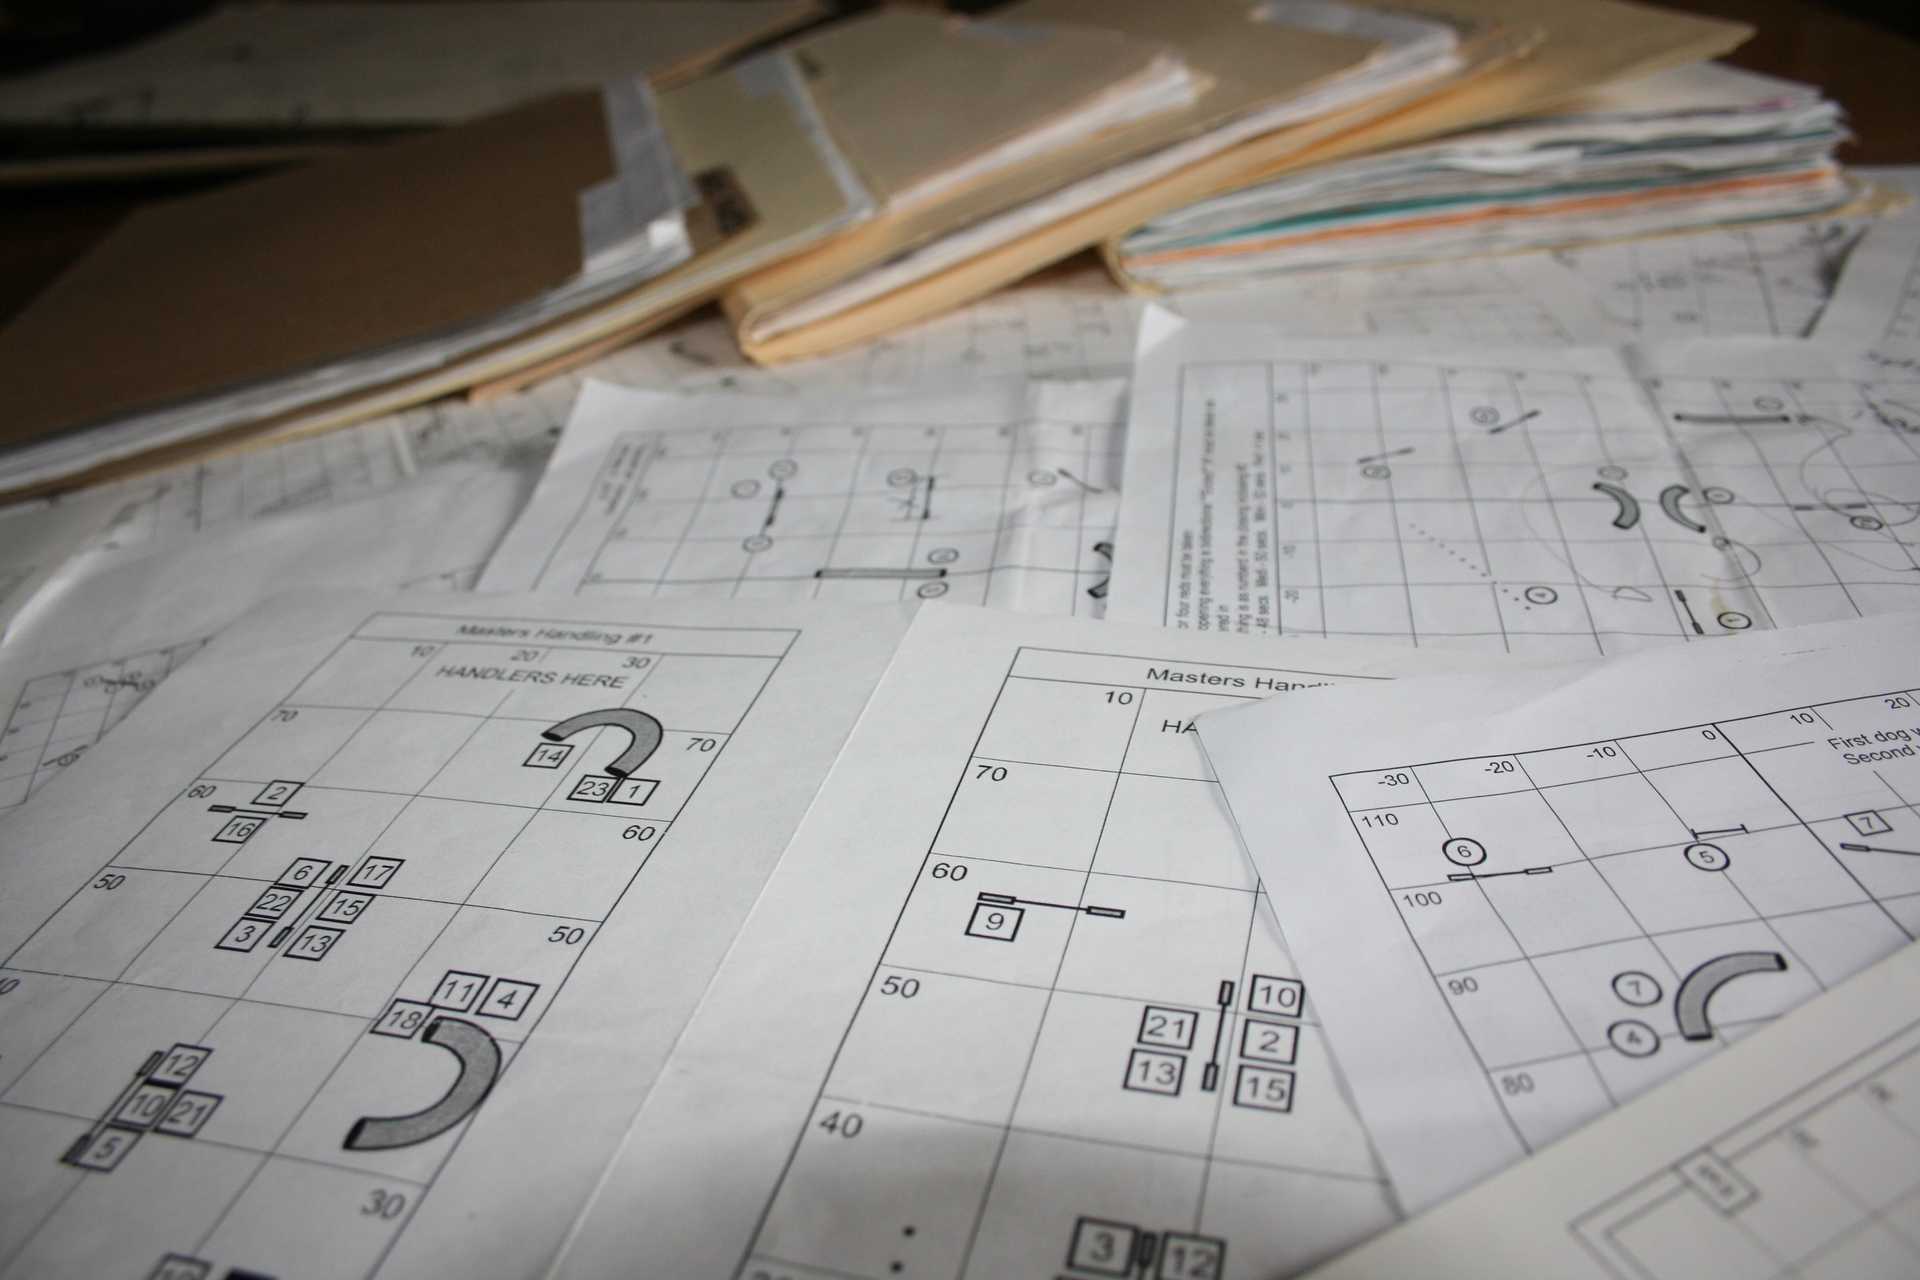
Dana Pike Advanced Class Course - Nov 17, 2005
27 Nov 2005
Dana Pike designed a fast, flowing, and challenging course for her advanced class this past week. At first glance the Serpentine Serpentine Handling TechniquesSerpentine Sequence at the opening and again at the midpoint may appear to be the only challenges... How would you handle it?Dana also had multiple handling options for other areas of the course as well. Here’s her course:
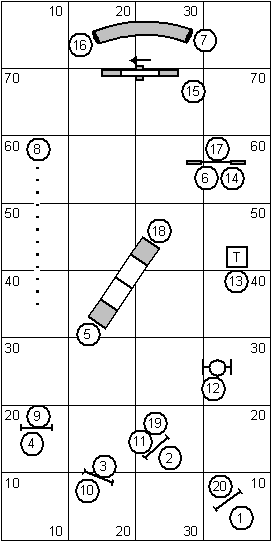
The opening four obstacles are a jump into a distorted Serpentine. The most common handling was to use a Lateral Lead Out to between jump 2 and 3 picking up the dog on the handler’s left into jump 3. A Lead Out Pivot could work as well at that point too. Both handler paths are shown below in black with the Handler Line Using the Handler Line - Front/Rear/Blind Cross LineHandler Line - Front/Rear/Blind Cross Line shown in red. Anna and her Doberman Rommel used a third alternative, starting with the dog on her right and using a Post Turn Learning the Post TurnPost Turn/Shoulder Pull/Pivot Turn from 2-3 (staying back from jump 3) and then Rear Crossing Learning the Rear CrossRear Cross on the take off side of jump 3 once Rommel hand taken jump 3.
Two Options for the Opening
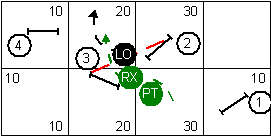
The main handling error I saw was handlers standing almost in the dog’s landing spot after jump 2. Dogs that understand the Lateral Lead Out will take jump 2 right against the left standard and land turning toward jump 3, so the handler has to leave the dog room to land. The spacing between jump 2 and 3 is such that a large strided dog will land and take a single (possibly short) stride before taking off for jump 3; this made well timed execution of a Lead Out Pivot more of a challenge, slow execution caused dogs to run wide on the approach.
For large dogs their forward momentum puts them right in line with jump 4. For smaller dogs a Post Turn and a little support of the dog’s line could be required. Otherwise handlers can take off running for the A Frame.
So which side of the A Frame do you want to be on? And if you are changing sides where would you cross? This is one of those cases where looking down course can help your decision.
To get from jump 6 to the tunnel most handlers will need to get to jump 6 (or the landing of jump 6) to manage the teeter-tunnel discrimination. So based on that handling “requirement”, at some point the handler will need to get on their dog’s left side. The two primary handling approaches were to cross between jump 4 and the A Frame or cross on the down contact of the A Frame.
Handling the Teeter-Tunnel Discrimination
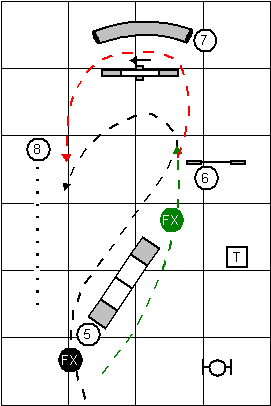
Using a Front Cross Learning the Front Cross - VideoFront Cross on the approach to the A Frame required the handler to be far enough ahead of their dog to not slow it down. It also puts the handler between the dog and the off course weave poles (I don’t recall any dogs taking the weave poles instead of the A Frame). A Rear Cross Learning the Rear CrossRear Cross could work too, but an impatient (failed) attempt could push the dog out toward or even into the weave poles. This handling is shown in black in the figure above.
Crossing on the down contact of the A Frame either requires that your dog not perform Running Contacts or if it does that you can beat it to the bottom. I don’t think a Rear Cross is warranted here, you don’t want to turn the dog toward the teeter. So waiting to cross here pretty much requires a dog with a contact stop and a Front Cross.
Then it is push out to the tunnel. All handler’s layered the teeter. Then run to the weaves. The dog sees the handler going to the weaves and it is a straight on entry. The red handler path above shows how a handler could assist their dog all the way through the tunnel if necessary from either approach to jump 6.
Dana pointed out that it is advantageous to get ahead of your dog coming out of the weaves. The reason is you actually want to cue the dog to take a long stride going over jump 9. This assists in getting the dog to the far side of jump 10 and not curling back to the handler after jump 9.
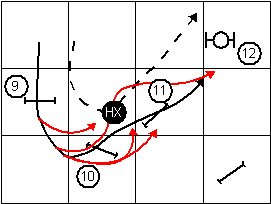
All of us initially handled the distorted Serpentine using same side Serpentine handling (the dog on the handler’s right all the way through to the tire). With the jump spacing this was a real handling balancing act; especially for the long strided dogs. Assuming you got the dog over the correct side of jump 10 you have to immediately turn the dog over jump 11. Even with the tight turn over 10 big dogs are really moving as they land and you have to turn them on the one stride they take before the jump. The handler can’t be standing around either to get down course.
For some dogs you have to add a Half Cross to get the dog to make the turn over 10 and then immediately open up toward jump 11. Some handlers had to really cue a Front Cross and wait for the reaction; even if it meant the dog taking an additional stride after jump 10.
Of course numerous failure modes are possible as shown in red below. Not supporting the dog’s path or turning off jump 10 before the dog is committed gets you the first red path. Not rotating back towards jump 11 gets the dog to run by the take off side of jump 11. Being late to call the dog into you over jump 10 “earns” you the other two red paths.
Half Cross Serpentine Handling
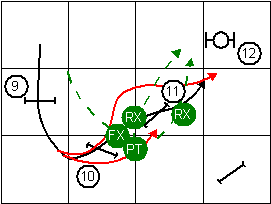
Dana gave us another handling option. Instead of moving toward the Half Cross location stay closer to jump 10 and Front Cross while the dog is still on the take off side of the jump.
Then Post Turn Learning the Post TurnPost Turn/Shoulder Pull/Pivot Turn the dog over jump 11 and Rear Cross either the take off or landing side of jump 11. While this sounds like a lot of handling in a short space it actually executes nicely and once you get the Front Cross you just wait for the dog to pivot around you and then wait again for the dog to take the jump; so most of the time you are executing these maneuvers in the same spot on the course.
Dana’s alternate handling also seems to have fewer failure modes. A slow/late Front Cross will push the dog past jump 10. But since you are moving parallel to the dog’s path on the approach to 10 you won’t have the dog turning in to you before the jump. As long as you hold your ground for the Post Turn and don’t step in toward your dog you shouldn’t push the dog off the jump. Worst case you’ll wrap the dog around your body to make the turn, taking extra time. Of course patience is still a virtue for the Rear Cross, stepping in on the take off side will push the dog off the jump.
Front Cross - Post Turn - Rear Cross Handling
All of us could Lead Out from the table so we could be in position near the left standard of jump 14 when we released the dog and Post Turned to the teeter. Dana pointed out that if you don’t have a Lead Out you could also be on the dog’s right at the table and use a Rear Cross to turn the dog to the teeter.
An Inside Arm/Flip sent the dogs into the tunnel from the teeter. Then it was layering the teeter again. A nice thing to know is almost no dog needs the handler to be at the tunnel exit or even at the approach to jump 17. Coming out of the almost straight tunnel the dog looks for the handler and if you are anywhere near jump 17 that is the only obvious next obstacle to the dog. So that can be used to your handling advantage.
Once again handling jump 17 to the A Frame could be influenced by which side of the A Frame you want to be on to get to jump 19. If you have a contact stay you can just turn toward the A Frame, keeping the dog on your left, and cross on the downside of the A Frame (shown in blue below). Speedy Anthony just pushed on his even speedier BC Chaz’s line as he released her and negotiated the whole sequence with her on his left (shown in green below). A third possibility Dana presented was to Front Cross between jump 17 and the A Frame (shown in black below).
A Frame to Finish Handling
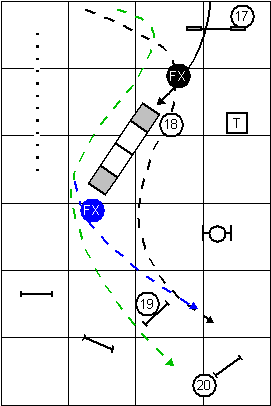
The first run I tried the Front Cross on the approach to the A Frame and, even though I left the teeter down contact when Milo committed to the tunnel and ran straight to the Front Cross location, he just beat me there and I couldn’t get the cross in. The second time I left a little more lateral distance from the teeter and just made the cross in time. A quick measurement on the diagram shows the dog travels about twice as far as the handler does with this handling; so it pays to know your dog’s speed.
From the A Frame it was just a “Go” and a “Go” with the dog moving out ahead of you over the jumps to the finish.
I would call this a “classic” Dana training course, good flow, good challenges, close and far handling, and multiple handling options at several sections of the course. A lot of fun to run!
If you enjoyed this article won't you please:  Thanks!
