
Dana Pike Advanced Class Course - Mar 2 2006
18 Mar 2006
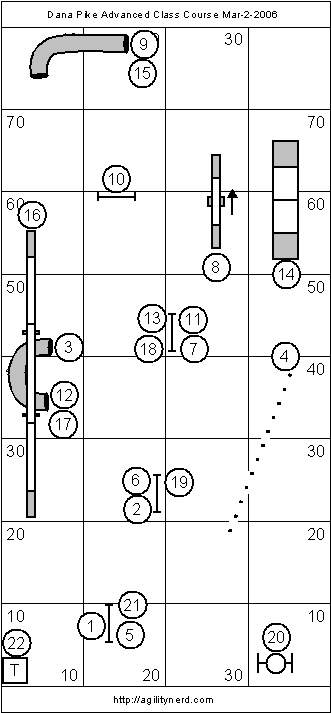
Dana Pike designed an even more challenging sequence using basically the same equipment setup as one of her previous courses. So if you set up this one don't forget to try the other course too. The teeter has been turned around and a table was added as the last obstacle.We had guest instructor Anne Riba coaching us through the course. I’ve trained with Anne since Mr Peabody and I first started in agility, it is always fun to work with her. The funny part about this course (in the incredulous sense of funny) was it was taking advanced dogs and handlers several minutes to get through the course on the first attempt. Milo and I retried some sections 2 and 3 times :^).
The jump-jump-tunnel opening was followed by a tough On Side weave entrance, followed by a classic three jump Serpentine Serpentine Handling TechniquesSerpentine Sequence. At the exit to the Serpentine was a tight and challenging scoop or cross to the teeter. A send to the tunnel followed by an Around jump back into the tunnel sets the handler up for a Layering opportunity at the A Frame. Then it is run-run-run through the dog walk and a careful handling into the tunnel for the last time. One last run-like-hell stretched Serpentine ending at the tire. The closing wraps the dog out of the tire, over a jump to the table. This is definitely a course to set up and try running the sections with different handling approaches. Here’s her course:
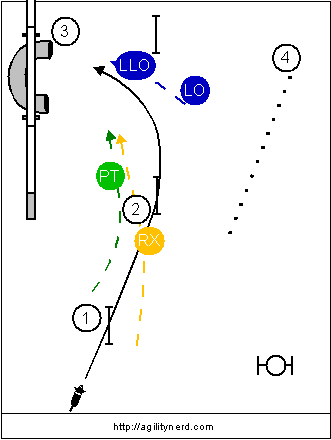
The opening two obstacles are setup so they can be handled as a straight line with the handler either on the right or the left. Handling down the left of the jumps allows for a Post Turn Learning the Post TurnPost Turn/Shoulder Pull/Pivot Turn to the far side tunnel entrance (shown in green below). Handling on the right, one could Rear Cross Learning the Rear CrossRear Cross on the take off of jump 2 (shown in yellow below). Or for the distance inclined, Lead Out or Lateral LeadOut and Push or draw the dog Across The Feet into the tunnel (shown in blue below).
Handling Options for the Opening Sequence
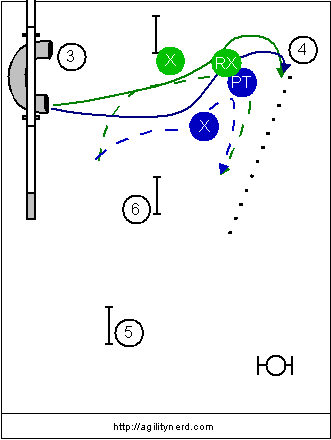
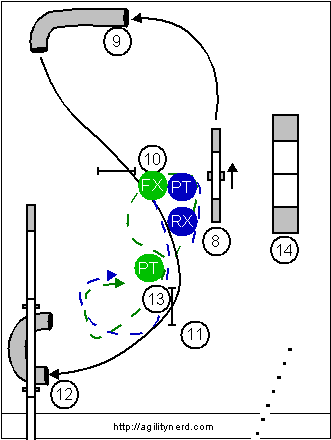
Coming out of the tunnel and into the weaves was all about timing and handler location. There were two primary handling options. The handler could get to just past the landing of jump 13/18/11/7 (green X below) and direct the dog to their right hand and Rear Cross to the on side weave entrance. This approach was difficult for many of us as the dog is turning toward you from the tunnel and clearly sees the jump. It is a classic handler focus vs obstacle focus “training opportunity”. One benefit of this handling was it gives the dog a good view of the weaves once they are passed the jump, but you have to set your dog up for the weave entrance and be patient on performing the Rear Cross.
Alternately, the handler can position themselves to closer to the weaves and further from the off course jump and pick up the dog on their left hand (blue X below) and Push/Post Turn into the weaves. A very slight Half Cross at the X location could be helpful to clarify your intentions for dogs looking hard at the off course jump. Or from the same location pick up the dogs on the handler’s right hand and Front Cross-Post Turn to turn the dog into the weaves (not shown - substitute a Front Cross at the blue X).
Weave Approach Handling Options
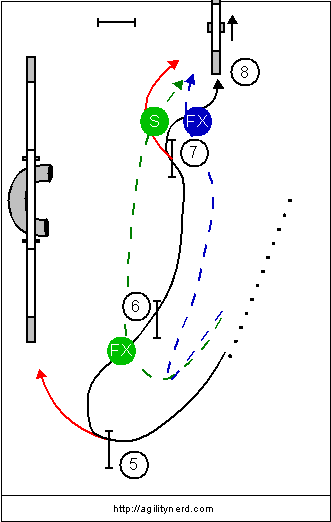
Coming out of the weaves is a classic three jump Serpentine with the added challenge of an offset teeter entrance. As is so often the case, the handling of the Serpentine could/should be dictated by the handler’s plan for getting to the next obstacle. In this case, the most viable options for the final jump to the teeter were to handle from the left of the jumps and scoop the dog on the landing and push to the teeter or handling from the right of the jump and Front Cross over the jump. With either option the handler had to find a way to be ahead of their dog at that last jump.
For a fast dog and/or slow handler coming out of the weaves a Go Go Jimmy Go!Go Jimmy Go Again command was invaluable. There really were few other options for the dog to take so sending the dog out to the jump and moving “briskly” to jump 6 was a safe way to get ahead of the dog.
Handlers taking the jumps on their right had to run hard to get to the take off side of jump six. The handler had to be in position to direct their dog to the correct side of the jump and not push it around to the backside of the jump. The handler also had to be far enough ahead of the dog at jump 6 to still beat their dog to jump 7. For the scoop to work the handler has to be approaching jump 7 ahead of their dog, call the dog into them (verbally and/or physically with a shoulder/arm signal) and then meet the dog just past the far jump standard (the green S in the diagram below). The dog has to have room to land tight to the jump and understand they are turning upon landing. In my opinion (once the handler and dog have the basic skills) this handling is one of those that the handler just has to believe they can do. It is a pretty good distance and with a fast dog the handler is running full out while directing the dog, so if the handler has any doubts in their mind approaching that last jump they’ll “chicken out” and try to Rear Cross on the landing of the jump which just didn’t turn the dog tightly enough to get to the teeter (shown in red below). There were a number of encouraging “whooo hooos” shouted from the handlers watching as teams were successful in executing this sequence.
Handling with the jumps on the handler’s left was no less exciting (shown in blue below). If the dog had a good long send (“Go”) to jump 5 the handler didn’t have to be as fast to get to the landing side of jump 6. Once the dog was committed on the take off side of jump 6 the handler should be moving fast to get in position to direct the dog over jump 7 while cuing a short stride/wrap of the jump. The handler then executes a Front Cross as the dog comes around the jump to tighten the line to the teeter. Again the handlers who could get in position at the end of the Serpentine were successful, the others were not so successful.
For both handling approaches the most common failure was the dog running by either jump 6 or 7.
First Serpentine Handling
So you might think the fun was over at this point… From the teeter a send to the tunnel allowed the handler to stay on the landing side of jump 10. Although not required it was easier on the handler than escorting the dog and possibly getting caught on the take of side of jump 10. The handling options for jumps 10 and 11 to the tunnel were to either Front Cross to Post Turn (shown in green below) or to Post Turn to Rear Cross (shown in blue below) the Around jump at 11. The first maneuver gets the dog to turn coming out of the tunnel toward jump 10. The second sets the dog up for the Around of the jump 11. The Rear Cross seemed to set a better line for the dog to the entrance at the far side of the tunnel; it was easier to over-rotate the Post Turn after the Front Cross and direct the dog to the near side tunnel entrance.
Around Jump Handling
Coming out of the tunnel the handler needed to move just enough to pick up the dog and set the line to jump 13 and the A Frame. From there the handler could layer the teeter, if desired, send to the tunnel, and move straight to the dog walk. There should be no need to pickup the dog at the tunnel. At the end of the dogwalk the handler just rotated in toward the dog (Counter Rotate) and run to the tunnel.
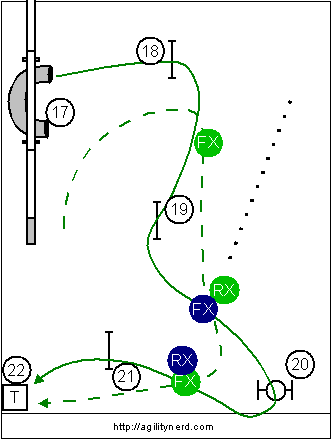
The final Serpentine of the course was distorted with the tire as the third obstacle. There were a number of handling possibilities and again handlers had to decide on their handling for the tire through the closing sequence before choosing how to handle the Serpentine. One option was to Rear Cross on the approach to the tire and then Rear Cross on the take off of jump 21 to turn the dog to the table. Alternately a Front Cross on the way to the tire and then another Front Cross on the way to jump 21. For either handling the horizontal distance to the tire from the tunnel made handling the Serpentine with the jumps to the handler’s right the most popular approach.
Once the dog was committed to the tunnel they handler could get in position to send the dog over jump 18 and, once the dog was committed, start running fast to get in position to direct the dog over jump 19. For fast dog handlers it was a real foot race to get in position for the Front Cross before the tire. If the handler was able to “get” the Front Cross they were also far enough down course to be in position for the next Front Cross and a good line to the table. The Rear Cross was also a successful approach but did seem to give a wider dog path. Rear Cross handlers could also use a Front Cross on the approach to jump 21.
Handling the Finish
This is another great Dana Pike training course, good flow, great challenges, and multiple handling options all throughout the course. Give this one and its partner a run!
If you enjoyed this article won't you please:  Thanks!