
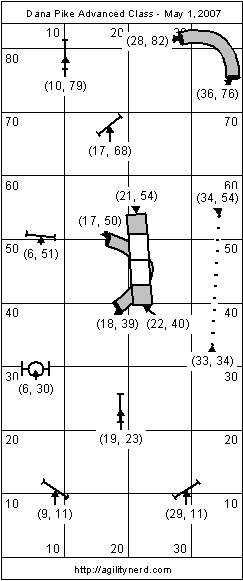
Dana Pike Advanced Class Course - May 1, 2007
20 May 2007
I just realized it has been over a year since I featured one of Dana Pike’s class courses. I assure you that is only due to my lack of time (and energy!). I greatly enjoy training with Dana and she always has challenging courses in her classes. I liked this one a real lot and Dana very kindly sent me her Clean Run Course Designer file for use on my site.
What really makes this course interesting are a couple places where the obstacle spacing and location is just a little bit “off” and it really makes the handling more challenging. So I highly recommend you carefully set up this course and give it a try. As usual Dana’s courses allow for multiple handling approaches. In this article I’ve tried to detail the interesting approaches for the various challenges.
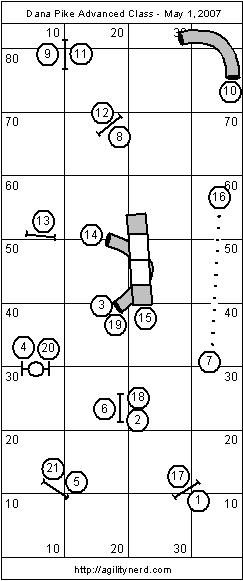
Course Sequence
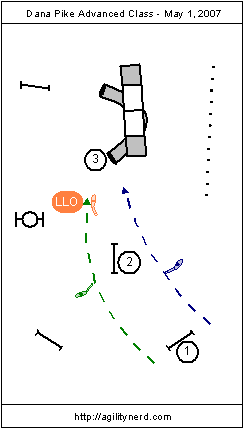
For the opening you can either treat 1-2-3 as a Single Sided Serpentine with the dog on either the handler’s right (green handler below) or left (blue handler below). Or you can use a Lateral Lead Out to between jump two and the tunnel and call the dog to your right hand (LLO and orange man below). My personal bias is the later.
Opening Sequence
The 4-5-6-7 sequence has an awkward jump spacing. Jump 5 is an Over-Come jump; to avoid a long stride over the jump the dog has to have cues from the handler to indicate they are wrapping the jump (it does help that there are no off course obstacles in that direction and the dog knows it is moving toward the edge of the course). Adding to the handling difficulties is the short horizontal distance between jumps 5 and 6. If the dog goes wide around jump 5 the dog has a very sharp approach to jump 6 which results in a sharp approach to the weaves (the dog’s path for both cases are shown in red below).
Over-Come to Weaves
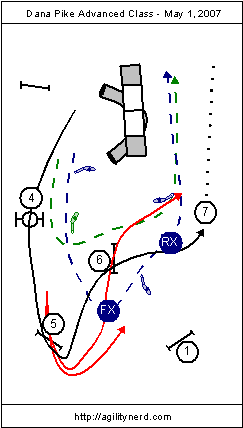
There are many ways to handle this section. I’d like to think I could send the dog from the tire while staying back this would make it clear to the dog that I want a tight wrap of the jump. I’d then move toward the standard of jump 6 nearest the A Frame. Then pick up the dog on my right arm before jump six. An RFP is probably needed for most dog’s here to get them to the take off side of jump 6. My forward motion would then get the dog to turn toward the weaves on the take off side of 6. But this is a tight balancing act; take a step past jump 6 before the dog is committed to the jump and the dog will go past the jump. If the dog takes jump 6 it is then a push out to the weaves. This would be a Single Sided Serpentine handling (handler path is shown in green above). Unfortunately, I couldn’t be successful with this handling with either Milo or Meeker. Milo has the send but he turns wide over jump 5; Meeker doesn’t yet have the send but he will wrap a jump standard very tight.
So the next “best” handling for us is to Front Cross Learning the Front Cross - VideoFront Cross between jumps 5 and 6 and then Pull the dog and Rear Cross Learning the Rear CrossRear Cross on the approach to the weaves (handler path shown in blue above). Again, there is a balance, if you don’t pull hard enough the dog will miss the weave entry, the same can be true if you push too hard on the dog’s line once they’ve turned toward the weaves when performing the Rear Cross.
From the weaves if your dog understands to go around to the back side of jump 9 (what Dana calls an “out” command) you can Front Cross the weave exit and handle through to the tunnel with the dog on your left. Meeker and I were successful with this approach. I never trained Milo with an “out” so I Pulled him from the weaves on my right and Rear Crossed the landing of jump 8 to turn him toward the back side of jump 9.
Weaves to Tunnel

Of course the wrong side of the tunnel is facing the dog coming over jump 9. So a shoulder pull to the tunnel followed by a Rear Cross gets you both going the right way after the tunnel.
The 11-12-13-14 sequence is one of those sequences where it really looks like you should be able to handle it all from one side - but none of us could. Depending on your dog’s ability to send; you are pretty much required to do two or three Front Crosses (the green and blue handler paths shown below - the blue path starts the same as the green path). If you end up with a cross on the landing side of 13 you are stuck on the “wrong” side of the A Frame (although in this case it isn’t that bad). If you can send your dog over 13 and into the tunnel while remaining “north” of the A Frame you can cut to the other side of the A Frame. Then you are nicely positioned both for the turn out of the tunnel to the A Frame and have a Post Turn into the weaves (which is nice if you have running contacts). This is a case where your dog has to see you moving to the other side of the A Frame before they enter the tunnel or they will likely turn the wrong way coming out of the tunnel looking for you.
"Almost" Serpentine and A Frame Handling
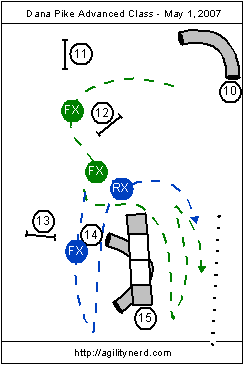
From the weaves it is a straightforward ending. I added jump 21 to Dana’s original course to take the dog’s out near the start jump.
I really like this course a lot; I’ve just set it up in my backyard and maybe I’ve have time to video tape a couple of these handling approaches for fun. So try it yourself, I think you’ll like it too!
If you enjoyed this article won't you please:  Thanks!