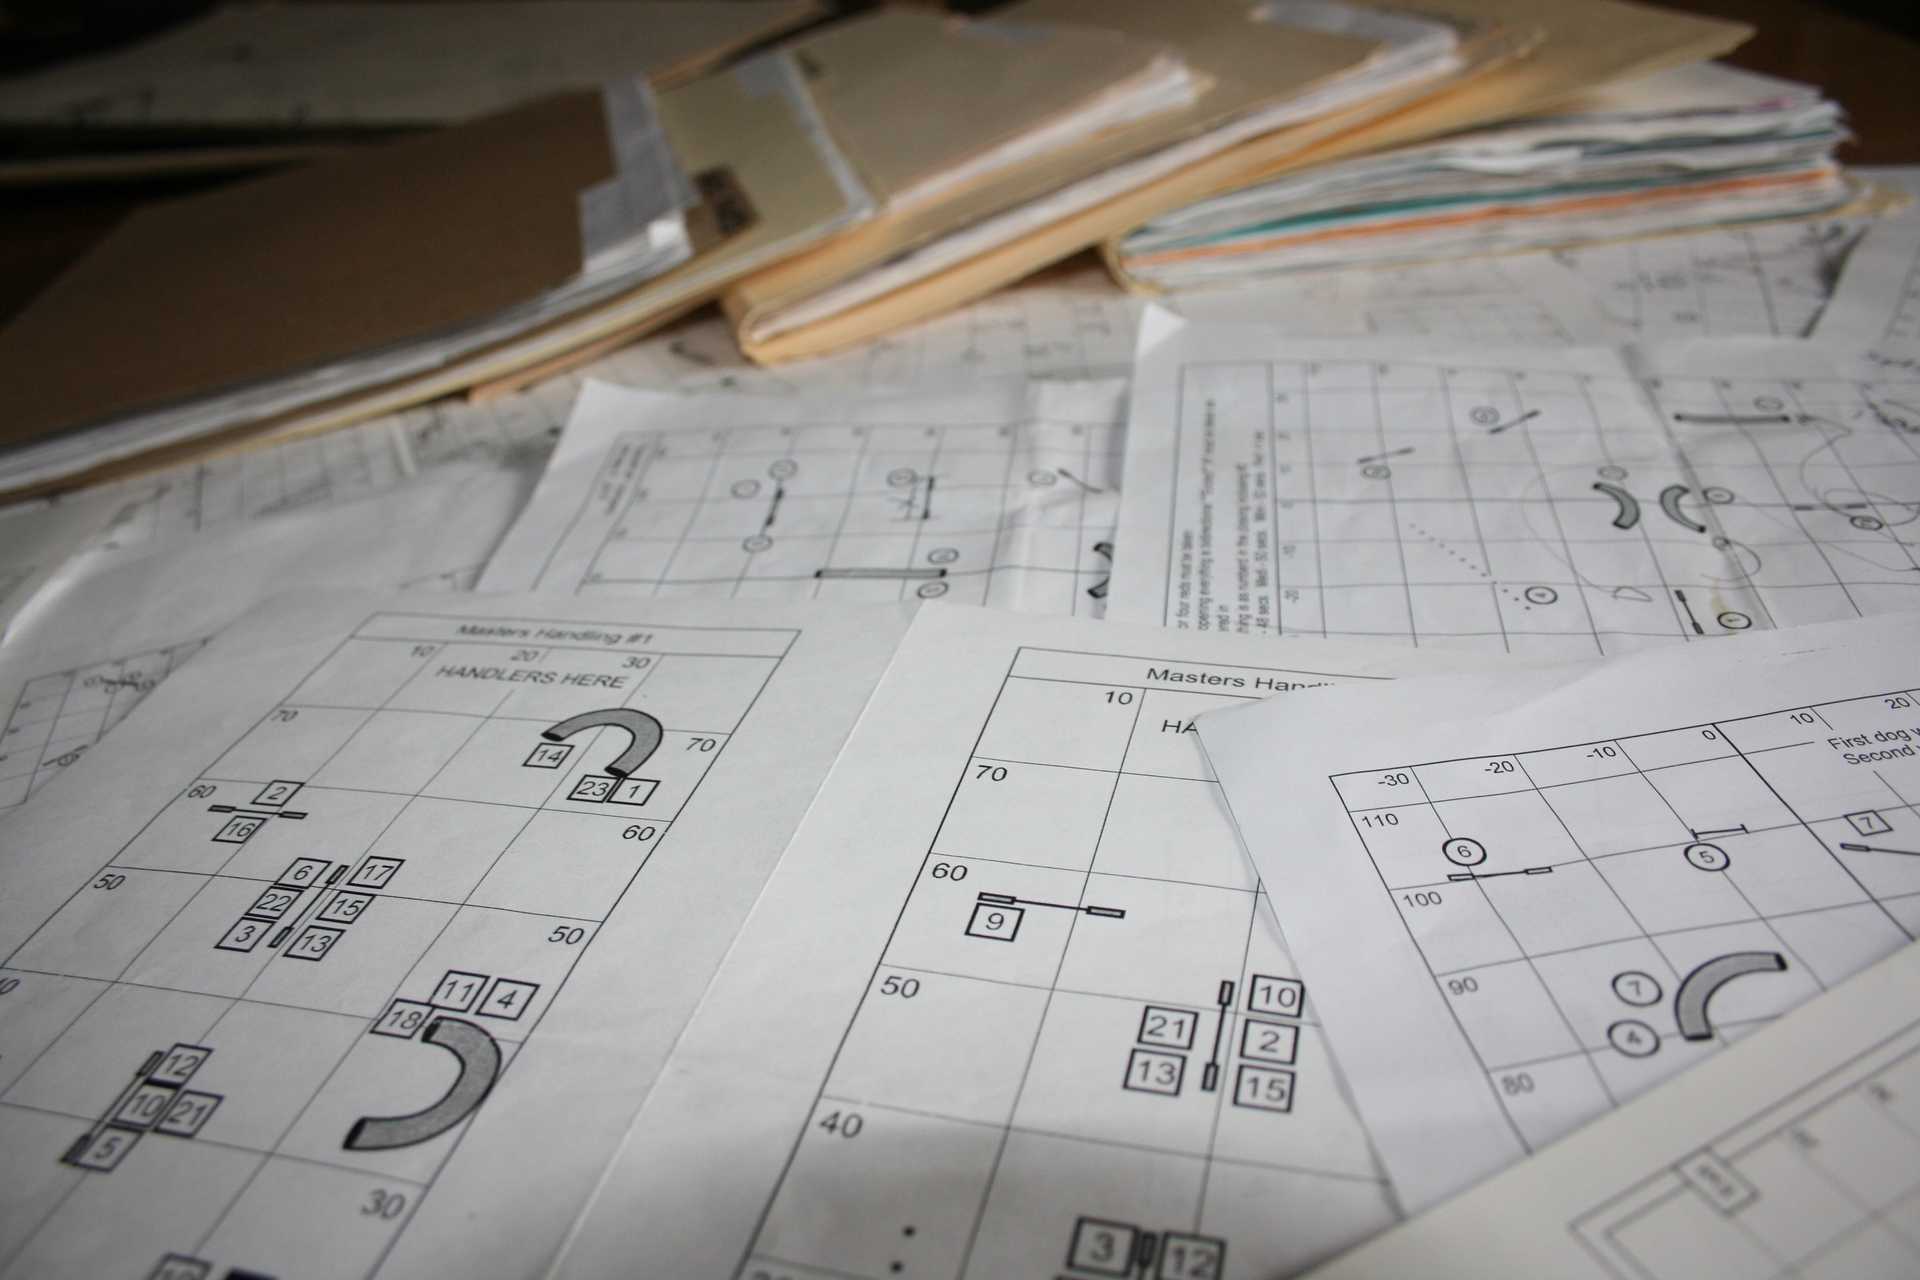
Dana Pike Seminar Course 2 - May 31 2005
22 Aug 2005
I just found some time to write up my notes on Dana Pike’s second advanced handling course from her handling seminar over Memorial Day weekend.
She had two really challenging courses based on very similar equipment setups. Dana has graciously allowed me to present her courses here. I posted the other variation a month ago. If you have the opportunity, these are really great courses to work on, all handlers can get a lot out of them.
Same disclaimer as for the previous course, I might not have the course layout exactly correct, I just scribbled the layout in my agility notebook. So if you give these courses a try, play around with tweaking the equipment a little to increase/decrease the challenges.
Take a look at this course and come up with your handling strategy before I take a crack at discussing it.
Course Setup
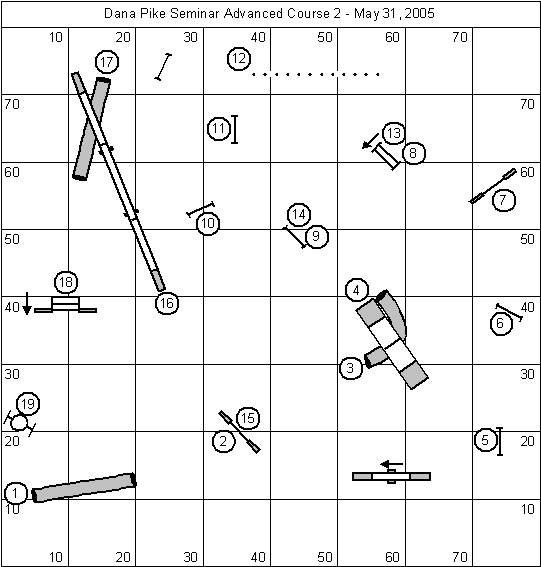
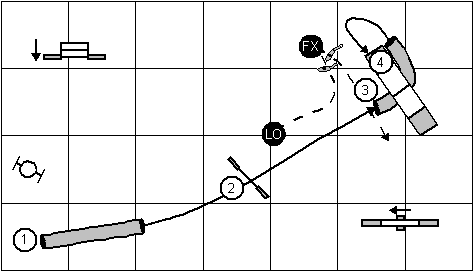
The opening tunnel to wing jump to tunnel was aligned so that it was awkward to handle without a Lead Out past jump 2. Although a handler could run with their dog as long as they maintained a lateral distance from the dog to avoid the wings of jump 2. All handlers had their dogs on their right into the tunnel so they could be in position to pick their dogs up coming out of the tunnel.
In order for the dogs to have good speed up the A Frame it is important to let the dogs take one or two strides out of the tunnel before turning the dog up the A Frame. There was no real chance of dogs taking the off course to jump 9/14 as long as the handler was in position. So Dana recommended the handler face the direction the dog was moving out of the tunnel until the dog had enough strides away from the A Frame. Then turn towards the dog, Front Cross Learning the Front Cross - VideoFront Cross (aka Counter Rotate) and change the handler’s lead arm to their left arm. I show this in the diagram below as a Front Cross (FX) because that’s what it is in my handling “vocabulary” (aka “Handling System” in the currently popular terminology).
Handling the Opening
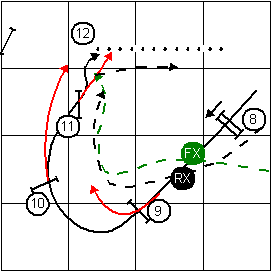
The challenge of the jump sequence following the A Frame was to get ahead of the dog to be in position to turn the dog to the double jump (jump 8). So the handler has to do everything they can to get and stay ahead of their dog through the sequence. One way to approach jump 5, shown by the black dotted handler line, is to Rear Cross Learning the Rear CrossRear Cross on the approach to turn the dog towards jump 6. But for fast teams this strategy has the major disadvantage of starting the handler behind the dog.
Handling the Long Run
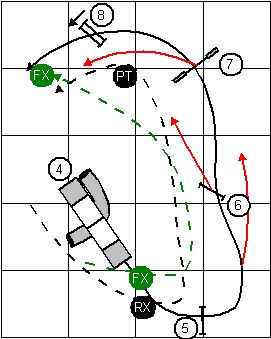
Handlers whose dogs have a solid A Frame contact can Front Cross Learning the Front Cross - VideoFront Cross on the downside of the A Frame and then release their dog. Then they can push the dog out to jump 5 on their right arm. This approach is shown by the green handler line. The distance the handler need move toward jump 5 is determined by the dog’s ability to send from the handler.
Whether Front or Rear Crossing before jump 5, the handler had to send their dog to the jump without moving any closer to the jump than necessary; any extra movement towards the jump doesn’t help the handler get ahead of the dog. Furthermore, you want the dog to not take too wide a turn over jump 5; it will make it harder for the dog to get over jump 7. Once the dog was over jump 5 the handler can run towards jump 6. In general, the further the handler gets ahead of the dog the tighter the dog’s turn around the jump. This “pulling” on the dog’s line will help the dog take jump 6 and not run past it.
Depending on how wide the dog went around jump 5 the handler may have to stay close to the line between jumps 6 and 7 to be able to push the dog over jump 7. If the dog was on a straight line from jump 5 to jump 6 to jump 7 the handler could just support the dog’s line. The handler could then fade towards the landing side of jump 8.
Before continuing with the analysis of the next obstacles let’s skip ahead to the decidedly ugly weave pole entry. It really is a 90 degree entry right off of jump 11. So for all handlers it was pretty clear that you’d need to be in the vicinity of the landing of jump 11 to help the dog into the weaves. So that makes the landing of jump 11 a place you have to get to.
So from jump 7 how do you handle the turn to jump 8 and the Pin Wheel so you can get to jump 11? There were really two approaches. One is to Post Turn Learning the Post TurnPost Turn/Shoulder Pull/Pivot Turn from jump 7 to 8 and then Rear Cross Learning the Rear CrossRear Cross on the flat between jump 8 and 9 (the black handler path in the diagram above and below). This approach would be required if the handler can’t get away from their dog without the dog going off course (the red dog paths above). The movement of the handler towards jumps 9 and 10 with their left arm extended (again to support the dog’s line) guides the dog through the jumps.
Dana pointed out a more aggressive handling was once the dog was committed to jump 7 to fade hard toward the landing of jump 8 and Front Cross on the landing side while the dog was approaching the double jump (the green path in the diagrams above and below). This way the dog knows to change their Lead before the jump so they are prepared to turn to their right before the take off for jump 9. Then it is just a slight Post Turn through jumps 9 and 10 with the handler moving to the landing side of jump 11.
Regardless of the way the handler got to the landing side of jump 11 they need to be there ahead of the dog. Then a slight Scoop and wrap around the handler’s hip as the handler points towards the imaginary pole just ahead of the first weave pole sets the dog up for a clean entry.
Handling the Pin Wheel to Weave Poles
Well that was a pretty challenging sequence, where you had to run fast, balance your position with the support of the dog’s line, and get to your spots. But the challenges of the course weren’t over yet.
Again it was important to look at challenges down the course before handling the double jump at 13 again. This time you have to look all the way to the triple jump at 18. Unless your dog can reliably work a long distance gamble, most handlers wanted to be on the left side of the dog walk so they could have their dog on their left as they went toward jump 18. Given that requirement, the handler had to take jump 15 in such a way as to allow them to put their dog on their right on the way up the dog walk.
There was also the matter of the distance to the jump at the end of the jump sequence (jump 15) to take into consideration. Fast dog handlers had to plan to get ahead of their dogs for jump 15. So what to do? Coming out of the weaves handlers could Post Turn to jump 13 and then Rear Cross on the take off of jump 14 (the black handler path below). Once again starting a long running sequence behind a fast dog isn’t a good idea.
Handling the Weave Pole to Double Jump
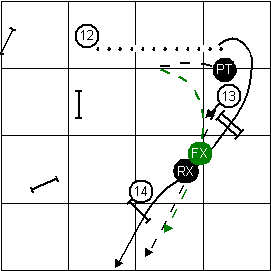
The other approach, shown by the green handler path, was possible with dogs that could weave independently from the handler. In this handling, the handler establishes lateral distance from the weaves and fades towards the landing side of the double jump while the dog is still in the weaves. You want to be moving across the face of the double jump as the dog turns towards the jump; moving parallel to the dog path. Then when the dog is in position to make the turn to the jump execute the Front Cross and Run toward jumps 14 and 15.
So the big question is which way to turn the dog after jump 15 so the handler can get to the left side of the dog walk? In running the course we found that turning the dog to their right over the jump (the black handler/dog lines below) tended to have a wider dog path and sometimes caused the dog to take either of the red off course paths. The Post Turn/Front Cross (counter rotate again) of the green paths caused a tight wrap around the jump upright and got the handler ahead of the dog. I can’t recall if anyone was able to Front Cross again before the dog walk. But, regardless of the way the dog turned, the handler could Rear Cross.
Handling the Close
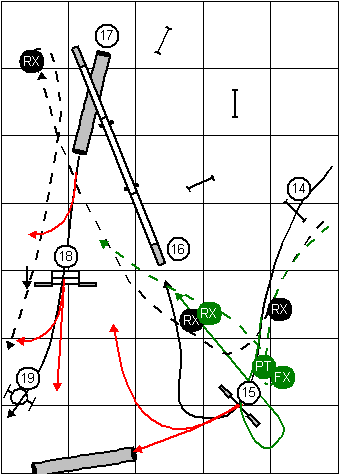
All the advanced dogs were fine with the handler moving laterally to get around the tunnel. Then it was a question of how far the handler had to go to the end of the dog walk to get their contact behavior and be able to direct the dog into the tunnel. Handlers either used an Inside Arm or a Rear Cross (some would call this a Tandem turn or Rear Cross on the flat) to turn the dog to the tunnel.
Then it is “just” a foot race between the handler and the dog. At the end of a three day seminar I have to say some of us were flagging when it came time to race their dog out a straight tunnel. So all three red off course lines occurred. The slight turn of the course to the handler’s right helped teams succeed due to the dog’s inclination to curl slightly back to the handler. In this sequence it was helpful if you have a good send or “Go” command along with an outstretched arm to direct your dog ahead of you.
This was just a great and challenging course to run. As usual, Dana first had us all walk the course and run it without any input. She then broke it down into four or five segments, discussed each and had us work on each section trying some of the handling approaches I discussed above. Her experience competing with large and small dogs was invaluable in helping each team improve their performance. When it came time to run the whole thing again at the end it was fun to feel completely confident in your execution.
I strongly recommend you setup and give this training course a try!
If you enjoyed this article won't you please:  Thanks!
